An Introduction to Linux File Permissions
Linux is a multi-user operating system, and it ensures the security of files with the concepts of “ownership” and “permissions”. You can use these concepts to control who can access and modify files. In this article, we will learn these concepts, and how you can change them using various commands.
Users and groups
Before we discuss the concept of “ownership”, let us first look at “users” and “groups”. Linux uses the concept of users to separate various people who use the computer. Every user has some properties associated with them, such as a user ID and a home directory. In order to make managing users easier, you can add users into a “group”. A group can have zero or more users. A particular user is associated with a “default group”, and can also be a member of other groups on the system.
If you want to view the users on your system, you can view the /etc/passwd file by running the following command:
cat /etc/passwdHere, every line contains details of a user. Specifically, you can see the username at the beginning of each line, before the first :.
Similarly, you can view the groups on your system by viewing the /etc/group file, by running:
cat /etc/groupAgain, each line contains the details of a user. The first part of each line contains the group name.
When running these commands, you will notice that there are a number of other users and groups that you didn’t create. These are system users and groups, which are used to run background processes securely.
Ownership and permissions
In Linux, we use permissions to control what a user can do with a file or directory. Linux uses three types of permissions:
- Read: For a file, the read permission allows a user to view the contents of a file. For directories, the read permission allows the user to view the names of files and other directories stored in it.
- Write: For a file, the write permission allows a user to modify and delete a file. For directories, the write permission allows a user to modify its contents (create, delete and rename files in it). However, this permission has no effect on directories unless the execute permission is also enabled.
- Execute: When set on a file, the write permission allows it to be executed. However, the permission has no effect on a file unless the read permission is also enabled. On the other hand, for directories, the write permission allows the user to enter the directory (with
cd) and view metadata (like file permissions) of the files and directories within it.
You might wonder: why won’t the write permission work without an execute permission on the directory? This is because of the fact that you can only retrieve the permissions of a directory when its execute bit is set. If it is not set, the OS won’t know whether it actually has the write permission.
Files and directories can be owned only by a single user and a single group. Whenever a user creates a file or a directory, the file is “owned” by the user and the user’s default group.
For any file or directory, there are three types of “permission classes”. You can assign different permissions to these classes, and thus control who can access and modify files. The permission classes are as follows:
- User: Permissions in this class affect the owner of the file.
- Group: Permissions in this class affect the group which owns the file. However, if the owner user is in this group, the “user” permissions apply, instead of the group permissions.
- Other: Permissions in this class affect all other users on the system.
Now that we have the theory in place, let us understand the concept with practical examples.
Viewing permissions
The easiest way to view the permissions of files in a given directory is to run:
ls -l <path to directory>If you want to view the permissions in your current directory, leave out the directory name at the end:
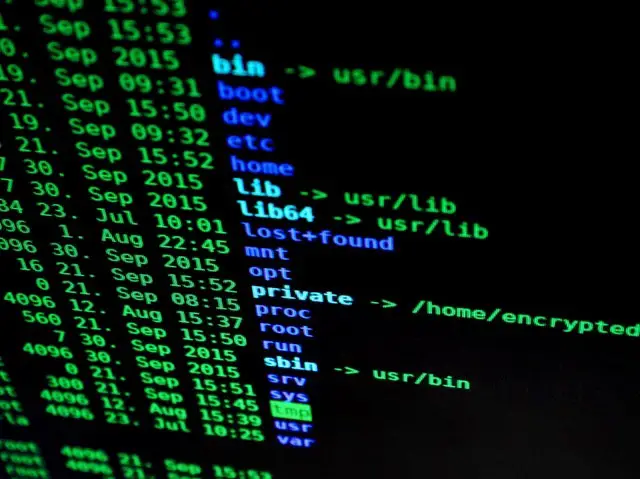
ls -lAs an example, we have shown the contents of the /etc directory by using ls -l /etc. The output is in the form of columns, as shown below:
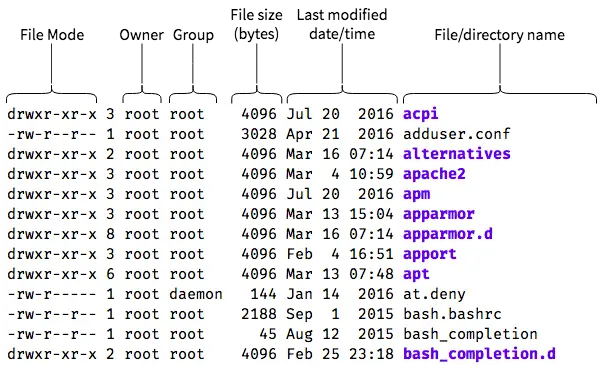
In this article, we will only focus on the “file mode”, “owner” and “group” columns. As you might have already guessed, the “owner” and “group” columns tell us which user and which group owns a file. The “file mode” column shows the file type and permissions in a compact way, as shown below:
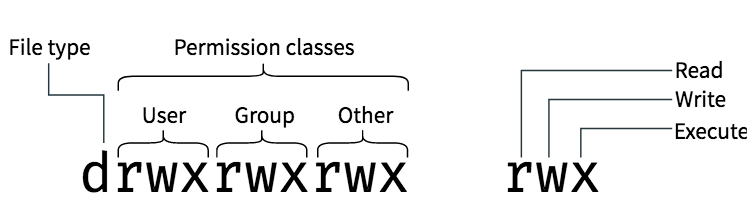
The first character represents the type of file. A normal file is represented with a -, directories with a d, and symbolic links with l. For example, in the screenshot of ls, you can tell that acpi is a directory, whereas adduser.conf is a file.
Then, we have the permissions of the corresponding to the “user”, “group” and “other” classes. The triplet rwx represents whether these classes have the read, write and execute permissions. If a - appears in this triplet, it means that the corresponding permission is disabled.
As an example, consider the acpi directory, which has the file mode drwxr-xr-x. This means that the “root” user has read, write and execute permissions. Users in the “root” group, as well as any “other” users have read and execute permissions, but not write permissions.
Now, consider the at.deny file, which has the file mode -rw-r-----. Here, the “root” user has read and write permission; and users of the “daemon” group have read permission. However, all “other” users have no permissions at all.
Representing permissions: numeric and symbolic mode
In the previous section, we have seen how permissions are presented using the letters rwx. This is also known as the “symbolic mode”. However, there is an additional way in which we can represent permissions using numbers, called the “numeric mode”.
As an example, consider the acpi directory we’ve talked about previously. The symbolic mode of this directory is rwxr-xr-x. Now, in order to get the equivalent numeric mode, we take the individual permissions of “user”, “group” and “other”. If a permission is enabled we put a 1, and if it is disabled we put a 0. By doing this, we obtain a binary number, and we convert it to octal. So, for the acpi directory, you can get the symbolic mode as shown below:
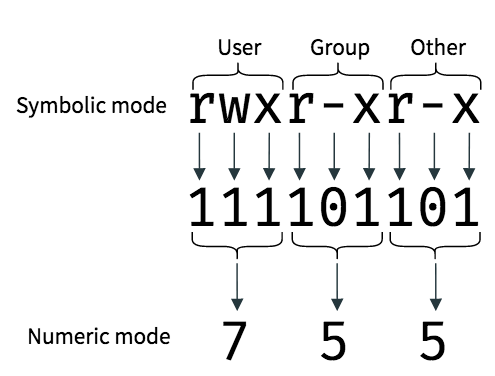
Thus, we obtain the numeric mode as 755. Similarly, given a numeric mode like 644, you can convert it back — convert the numbers to binary, and put a letter like r, w or x if the permission is enabled, or a - if it is disabled:
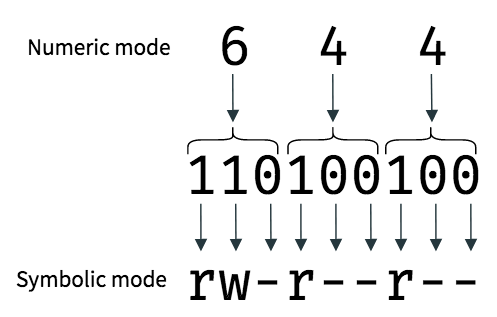
Thus, we obtain the symbolic mode rw-r--r--, which means that the owner has read and write permissions; whereas the group users and other users have only read permission.
If you aren’t familiar with converting binary numbers, you can use the file permission chart below:
Number**rwx triplet value****Description**0---No permissions1--xExecute2-w-Write3-wxWrite and execute4r--Read5r-xRead and execute6rw-Read and write7rwxRead, write and execute
Fortunately, most tools show us and work with symbolic mode. We rarely need to use numeric modes, except for some special circumstances.
Changing permissions: the chmod command
When you create a file or directory, you might want to change some permissions. You can do this with the chmod command.
First, we will create a file for testing purposes by running:
touch file.txtYou can look at the file’s permissions with ls -l. The file was created with the permissions rw-r--r--.

Now, suppose you want to add the execute permission for all users — owner, group and others. Since we want to add execute permissions for all users, we use a+x like so:
chmod a+x file.txta represents that we are changing permissions for all users, the + represents that we are adding a permission, and x refers to the execute permission. As you can see below, these permissions were added:

By default, chmod assumes that any changes will apply for all users, so you can leave out the a and simply write:
chmod +x file.txtchmod also accepts the letters u, g and o for “user”, “group” and “other”. It also supports the - symbol to remove permissions. For example, suppose you want to remove the write and execute permissions for “others”, and the write permission for “group”. To do so, run the following command:
chmod o-rx,g-w file.txtNotice how we used a comma ( ,) to separate the two actions.
Sometimes, instead of adding or removing permissions, we might want to set a specific permission. chmod also supports this with the = symbol. As an example, if you want to set the user’s permission to rw- and the group’s permission to r--:
chmod u=rw,g=r file.txtYou can also use numeric modes to set permissions. However, numeric modes set permissions for “user”, “group” and “other” at the same time — there is no way to change permissions for each class individually.
Suppose, you want to set the permission of rwxrw-r-- for a file, using numeric mode. The equivalent numeric mode is 764, so you can run the following command:
chmod 764 file.txtFinally, if you want to set permissions for all files in a directory, you can use the -R switch. For example, if you want to add the execute permission for all users, to all the files in the programs directory, run:
chmod -R +x programsKeep in mind that you can only change permissions of files you own. To change the permissions of files that you don’t own, you must use sudo as shown:
sudo chmod <file permissions> <file/directory name>Changing ownership: the chown command
In order to change the ownership of a file or directory, you can use the chown command. It can change both the owner and the group of the owner who owns it. (There is also the chgrp command which changes the group who owns a file, but chown can do it as well.)
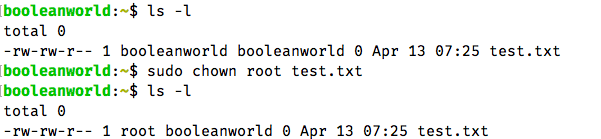
Suppose, you have a file named file.txt and you would like to change the ownership to the root user. To do so, run the following command:
sudo chown root test.txtUnlike the chmod command, you need to be the root user to change ownership information. In order to run the chown command as the root user, we have used sudo at the beginning. (If you are already using the root account, you can leave out the sudo.)
You can verify that the ownership changed using ls -l :
Now, suppose you want to change the owner group to daemon. In order to do so, mention the group name prefixed with a : like so:
sudo chown :daemon test.txtIf you want to change the owner user as well as the owner group, specify the user and group separated with a :. So, if you want to change the owner user to root and the owner group to daemon, run the following command:
sudo chown root:daemon test.txtSometimes, you may want to change the owner to a particular user and their default group. Although you could manually find out the user’s default group and then run the command, chown allows you to do this automatically by leaving out the : at the end. For example, if you want to change the ownership to root and their default group, run:
sudo chown root: test.txtJust like chmod, chown also supports the -R flag. So, for example, if you want to change the owner user of all files to root for the directory test, run:
sudo chown -R root: testAccess rights flags
So far, we’ve learnt about permissions and ownerships, and the commands used to work with them. In addition, there are some “access rights flags”, which affect files and directories in special ways. In this section, we are going to learn about what these flags do and how we can set these flags.
The sticky bit
Sometimes, you may want to make a “common workspace” in which users can share and collaborate on their files. Unfortunately, a careless user (or perhaps a malicious one) can delete or rename files in this directory. We can’t take away the write permission, since that would not allow users to work with each other’s files.
This is where the sticky bit is useful. When you set a sticky bit on a directory, files in that directory can be only removed or renamed by the root user, the directory owner, or the file owner. The sticky bit has the final say on this — other users won’t be able to delete the file, even though the permissions say otherwise.
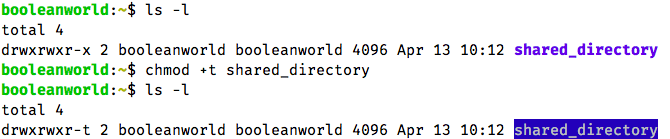
To set the sticky bit on a directory shared_directory, you can use the +t with chmod like so:
chmod +t shared_directoryDue to the sticky bit, the file mode gets a t at the end, as shown below:
You can also use the numeric mode 1xxx to set the sticky bit. The xxx here represents a general numeric mode like 762, 644 and so on, which we discussed previously in this article.
Suppose that shared_directory had a permission of 775. If we want to set the sticky bit using numeric mode, the command would look like:
chmod 1775 shared_directoryTo remove the sticky bit, you can use -t or leave off the 1 at the beginning:
chmod -t shared_directory
chmod 775 shared_directory
A practical example of this is the /tmp directory, where programs (running under different users) can store temporary files. To prevent accidental deletion of other user’s files, Linux distributions set the sticky bit on /tmp.
The sticky bit does not have any effect on files.
setuid and setgid
If you’re somewhat familiar with Linux, you may have used su or sudo to run some commands as the root user. If you’ve wondered how they work, the answer lies in the setuid and setgid bits.
When the setuid bit is set on a file, it runs as the user that owns the file. Similarly, when the setgid bit is set on a file, it runs as the group which owns the file. In particular, the su and sudo programs use the setuid bit — you can look at its permissions by running:
ls -l /usr/bin/sudoYou will find that su/ sudo has the setuid bit set (notice the s in the file mode) and is owned by root. Thus, when you run su/ sudo it runs as root, and launches any programs that you want as root.

The setuid bit has no effect on directories. However, when you set the setgid bit on a directory, a few things happen:
- When a user creates new files or subdirectories inside this directory, they inherit the owner group. This differs from the default behaviour, where newly created files are owned by the user’s default group.
- Any new subdirectories also have the setgid bit set.
However, any files that were present before the setgid bit was set remain unaffected.
In order to set the setuid/setgid bit, you should first change the ownership of the file to an appropriate user (if needed). Now, to set the setuid bit using symbolic mode, run the command below. Since the file now belongs to a different user, we will use sudo:
sudo chmod +s <filename>Similarly, if you want to set the setgid bit, use g+s instead, like so:
sudo chmod g+s <filename>If you want to remove the setuid bit, use -s; for setgid, use g-s.
The numeric mode for setuid is 4xxx and setgid is 2xxx, where xxx is a numeric permission like 755, 642 and so on, as explained above. So, for example, if you want to set the setuid bit on a file and set the permission 755, run:
sudo chmod 4755 <filename>To remove the setuid/setgid bits with numeric mode, simply leave the 4/ 2 at the beginning:
sudo chmod 775 shared_directoryA note on access rights flags and chmod
If you’re working with files with an access rights flag, there’s one caveat you must be careful of.
As an example, say you’ve used chmod to set the mode of a file to 4750 (setuid bit and permissions of rwxr-x---). Some time later, you want to allow others to have read access to the file. If you’re comfortable with numeric modes, you might be tempted to write:
chmod 752 <file/directory name>However, this will clear the setuid bit! This is because, chmod assumes a leading 0 when you type a numeric mode that has less than 4 digits. This clears away the setuid bit. The correct command would be:
chmod 4752 <file/directory name>This applies for the sticky bit and the setgid bits as well.
Also, if you want to set more than one access rights flag with one chmod command, simply add up the flags and run the command. Suppose, you want to create a directory with the setgid and sticky bits set, with permissions of 755. As we mentioned previously, setgid has a mode of 2xxx and sticky bit has a mode of 1xxx. By adding these two, we get 3xxx. Finally, since we want to use 755 as the permission, we get the numeric mode 3755. Thus, you should run the following command:
chmod 3755 <directory name>Controlling default permissions: umask
Create a new file and a new directory using the touch and mkdir as shown below:
touch file.txt
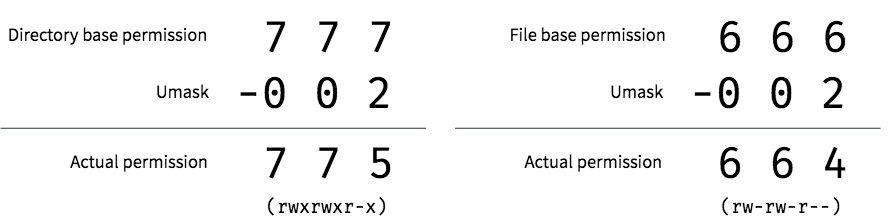
mkdir dirOn most distributions, you will see that file.txt gets a permission of 664 ( rw-rw-r--), and dir gets a permission of 775 ( rwxrwxr-x ):

But how do these files get their default permissions? An octal number, called “file mode creation mask” controls these default permissions. (Henceforth, we will simply refer to this as “mask”.)
Shells like bash and sh have a built-in command called umask, which allows you to control this mask. Importantly, this only controls the behavior of programs launched from the shell. Any program which isn’t launched from the shell, such as a desktop environment or a web application daemon wouldn’t follow these settings.
Here, we will restrict ourselves to the umask command in shell. For other programs, refer to their help manual to find out how you can change their mask.
Files have a base permission of 666 (or rw-rw-rw-) and directories have a base permission of 777 (or rwxrwxrwx). Next, to get the actual permissions, we take the base permission and subtract it from the mask. By default, shells use a mask of 002. If you perform the calculation, you’ll end up with the default permissions we saw earlier:
To change the mask, simply run umask with the desired mask value:
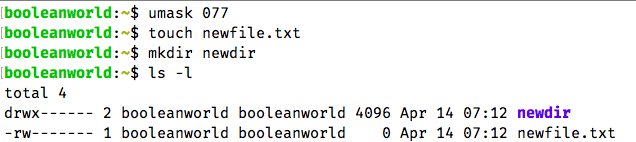
umask <mask value>As an example, suppose we don’t want “group” and “other” users to have any permissions. You can do so with the 077 umask:
umask 077To verify that it works, try creating a file and view its permissions. Notice how the “other” and “group” users have no permissions:
You can also control the access rights flags with umask. For example, if you want add the setuid bit to new files, and use the mask 077, run the following command:
umask 1077You can set other access rights flags in the same way.
If you want to always use this umask command whenever you use the bash shell, open the ~/.bashrc (on Ubuntu/Debian) or ~/.bash_profile (on other distributions) with your favorite text editor, and add the umask command at the end of the file.
Conclusion
Linux is a multi-user operating system. Thus, we need the concepts of file ownership and permissions to ensure the security of files, as well as the OS.
When working with permissions of system files, you should be very careful as wrong permissions can prevent programs from working correctly.