Getting Started with Docker – Part 2
Docker has changed the way developers run, organize and deploy their code and infrastructure. In the docker series articles, we will be understanding how Docker works, installation and running code, deployment, container management and more. In part 1, we explained how Docker works and how it is different from traditional systems involving virtual machines. Do check out the first part, An Introduction to the Docker Ecosystem before starting out with this article.
Installation
Docker comes in two versions, Community Edition(CE) and Enterprise Edition(EE). The Enterprise Edition is focused towards corporate production environments where stability is very crucial. They also give support for the infrastructure by charging a fee. The Community Edition is the free version which is perfect for developers and small teams to experiment with the architecture and deploy apps for non-mission critical environments.
To install Docker CE in your system, please follow the official installation instructions for your respective operating system.
NOTE: If you want to install docker in Windows, do note that it will only work in Windows 10. Also, make sure you have enabled Hyper-V and also Virtualization in your BIOS settings.
Getting started with the commands
After you have installed Docker, the view the list of available commands, just run:
docker
It will output the following commands along with their descriptions.
Management Commands:
  config      Manage Docker configs
  container   Manage containers
  image       Manage images
  network     Manage networks
  node        Manage Swarm nodes
  plugin      Manage plugins
  secret      Manage Docker secrets
  service     Manage services
  stack       Manage Docker stacks
  swarm       Manage Swarm
  system      Manage Docker
  volume      Manage volumes

Commands:
  attach      Attach local standard input, output, and error streams to a running container
  build       Build an image from a Dockerfile
  commit      Create a new image from a container's changes
  cp          Copy files/folders between a container and the local filesystem
  create      Create a new container
  diff        Inspect changes to files or directories on a container's filesystem
  events      Get real time events from the server
  exec        Run a command in a running container
  export      Export a container's filesystem as a tar archive
  history     Show the history of an image
  images      List images
  import      Import the contents from a tarball to create a filesystem image
  info        Display system-wide information
  inspect     Return low-level information on Docker objects
  kill        Kill one or more running containers
  load        Load an image from a tar archive or STDIN
  login       Log in to a Docker registry
  logout      Log out from a Docker registry
  logs        Fetch the logs of a container
  pause       Pause all processes within one or more containers
  port        List port mappings or a specific mapping for the container
  ps          List containers
  pull        Pull an image or a repository from a registry
  push        Push an image or a repository to a registry
  rename      Rename a container
  restart     Restart one or more containers
  rm          Remove one or more containers
  rmi         Remove one or more images
  run         Run a command in a new container
  save        Save one or more images to a tar archive (streamed to STDOUT by default)
  search      Search the Docker Hub for images
  start       Start one or more stopped containers
  stats       Display a live stream of container(s) resource usage statistics
  stop        Stop one or more running containers
  tag         Create a tag TARGET_IMAGE that refers to SOURCE_IMAGE
  top         Display the running processes of a container
  unpause     Unpause all processes within one or more containers
  update      Update configuration of one or more containers
  version     Show the Docker version information
  wait        Block until one or more containers stop, then print their exit codes
We will go through some of the most important commands that are used almost always.
Playing with Docker Images
In our previous article, we talked about the concept of images. There are a lot of repositories which offer pre-built images. The official one is called the Docker Hub.
Suppose that I want to use python in my Docker container. To search for the pre-built python image in the Docker Hub, use the following command.
docker search python
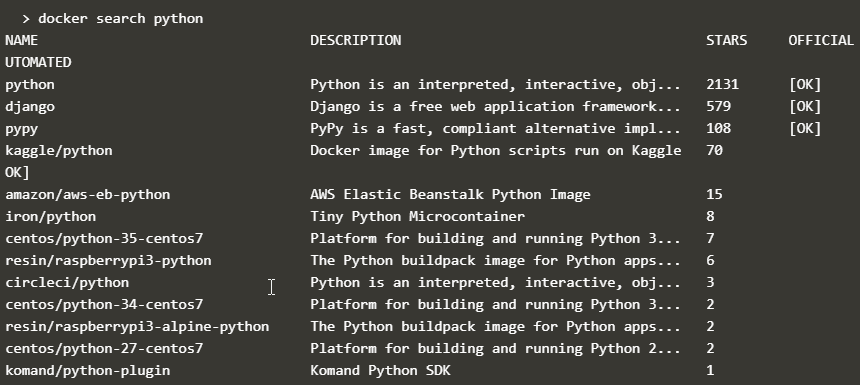
It will return a list of public images from the Docker Hub. The one at the top with the official tag and most number of stars is the official python image. Similarly, you can search for any image that you want to use in your container using the docker search command.
After you have searched your image, run it by using:
docker run -d <image_name>
The -d flag is optional and is used to run the command in the background without capturing the entire terminal. It is specifically useful for services like web servers or databases like Redis.
Now, there may be a lot of commands running in the background. To list all of them use:
docker ps

It will list a table with the following columns:
- CONTAINER ID – This is a random ID which is used to identify the processes.
- IMAGE – This is the name of the image that you pulled from the Docker Hub
- COMMAND – This is the command which is being run by the respective process
- CREATED – The time at which the process is created
- STATUS – It shows the amount of time the process was running
- PORTS – This is the ports to which the process gets attached to
- NAMES – Docker assigns a random friendly name which can be used to identify the process apart from the CONTAINER ID
By default, the ps command shows the list of running processes. To list all the processes use the -a or the --all flag
docker ps -a
Now, if you want to get to the details of a single process, use the inspect command.
docker inspect <container-id>
You can also use the friendly-name instead of the container id. It will give the same output.
There may be situations where you may just pull an image from the Docker Hub and run it later sometime. Use the following command to do it.
docker pull <image-name>
To see the list of all the images that you have pulled/downloaded use:
docker images
It will list out all of the images along with their sizes, image id and creation date.
To stop a docker image use the command:
docker stop <container-id|friendly-name>
Similarly to permanently delete a container, type:
docker rm <container-id|friendly-name>
Portable environments
To run apps in docker, we do not need to install any languages or development environments natively on our host machine. Now your question may be that how are the applications going to run without installing any environmental dependencies? This is achieved by using portable instances or runtimes without the need of installing anything. The biggest benefit is that it is like sandboxing and does not mess up with your host system. We have already seen how to download pre-built images from the Docker Hub. Every time we set up our environment in any machine, the dependent images of the application needs to be downloaded from the Docker Hub. Before doing that, we need to define the instances/dependencies that are necessary to run our application. We define them in a file called the Dockerfile.
Dockerfile is a text file in which steps are defined to create the environment. After it has been defined and configured, we perform some build steps to form an image which can be run to get a container up and running. All these may seem intimidating, so let’s understand all of it with some examples.
Example app
We will be building a demo PHP app that prints the text “Boolean World” in the browser. Now just imagine the dependencies that would have been required if we went for the traditional architecture. We would need a web server and also the different PHP modules installed in our system. This list goes huge for any modern web app and you certainly don’t want to install those dependencies manually every time you run your app on a different machine. So, we will be using some pre-built images that are available on the Docker Hub.
So, head over to Docker Hub and search for php. Click on the top result which says php official. That is the official php repository which we will be using. Now you should be seeing a big list of supported tags for the Dockerfile.
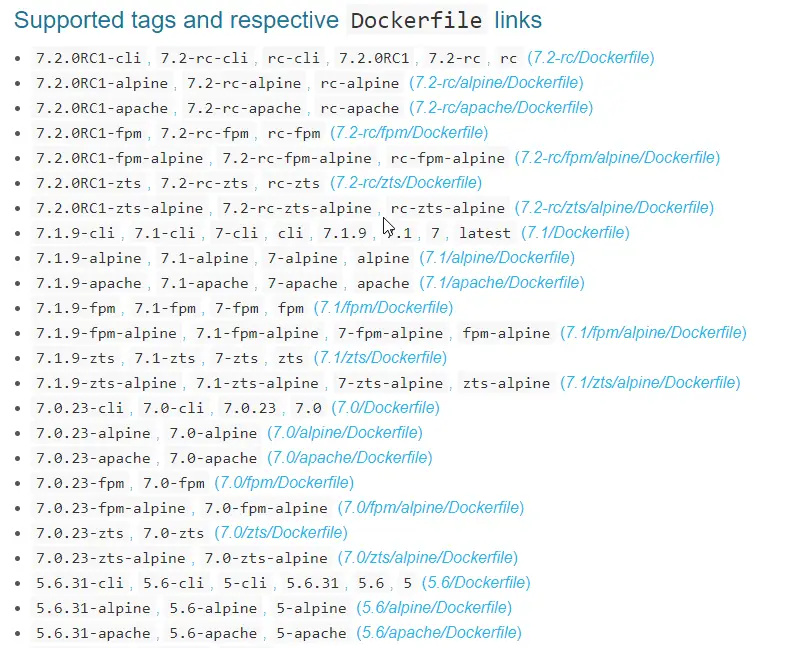
These are nothing but the different php modules like php-fpm or php-cli. We need the image with Apache on it for the example. So we will be using the 7-apache from the list of tags. If you scroll down in that page, you can see there are a few examples given on how to use the tags in the Dockerfile.
Similarly, you can use the docker searchcommand instead of searching in the Docker Hub page.
Create a new folder called Example and inside it, create a file named index.php. Now paste the following contents inside the file:
<?php
echo "Boolean World"
Save the file. In the same Example folder, create another file named Dockerfile. Paste the following content inside it:
FROM php:7-apache
COPY Example/ /var/www/html
EXPOSE 80
The first line is the tag that we used to fetch the respective image from the Docker Hub. The second line links up the directory to the webroot of Apache. The third line opens up HTTP port 80 so that we can see the output in a browser.
The final directory structure should look like this:
Example
 |
 +-- index.php
 |
 +-- Dockerfile
Now we need to build our customised image for the specifications we mentioned in the Dockerfile. Open up the terminal and navigate to the Example directory. Type in the following command to build the image.
docker build -t demo-app .
We named the image as demo-app. After the name, there is also a period(.) which specifies that the Dockerfile is in the current directory. The command should take a while to execute since it has to pull in all the components from the Docker Hub. After it’s done, type in the following command.
docker run -p 80:80 demo-app
The -p specifies port forwarding where we forwarded port 80 from the host machine to port 80 of the container.
After you run the above command Apache server should start. Open your browser and type inlocalhost at the address bar. You should see Boolean World displayed on the page.
The interactive mode
Docker also provides an interactive shell for any application/image that supports CLI based inputs. For example, if you want to use the Ubuntu shell, simply write:
docker run -it ubuntu
The -it flag sets up the interactive shell. It will give the following output:
root@e0e0689e3490
This is the shell for Ubuntu. Type in any of the Ubuntu commands and it will work. To exit the interactive shell, simply type:
exit
Commit and push
After you have worked with your image, you may want to save the state of the container for future use. This can be done using the commit command which is very similar to that of git version control.
docker commit -m "Commit message" <container-id> <repository-location>:<tag>
For example:
docker commit -m "This is a demo" 197387f1b436 bool/test-image:blog
Do note that here bool is the username. Usually, the username should be the one which you created when you signed up for Docker Hub. Also,blogis the tag given to easily identify between different commits.
Before you can push your image to the Docker Hub, you need to log in.
docker login -u <username>
After you log in by providing your password, push the image you want by typing:
docker push <username>/<docker-image-name>
After that, it should reflect on the repository’s dashboard.
Conclusion
In this article, we familiarised ourselves with the different commands of docker and made a demo application to display something on a web page. The biggest benefits are the sandboxing and portability features. Running applications in docker consume just a fraction of resources than it would in a full-fledged traditional virtual machine. Do let us know about your experience on playing with the commands.