How to Set up SSH Keys on a Linux/Unix Server

SSH (Secure SHell) is a network protocol that allows you to securely execute commands on and transfer files to a remote server. Typically, most servers running SSH are configured to use password-based authentication; however, this is vulnerable to brute-force attacks. SSH key-based authentication is a more secure and convenient way of logging onto your server. It uses a pair of keys to authenticate users and does not require a password to log in.
In this article, we will see how to configure a server to use SSH keys for authentication. To follow these steps, you will need a Linux/Unix server and a computer that has OpenSSH installed. MacOS and most Linux distributions have it installed by default. Windows users can use the “Bash on Windows” feature or use msys2.
How do SSH keys work?
When you connect to a server using SSH, the client and server establish an encrypted connection to exchange data. Once this connection is established, there is an authentication phase to check the user’s credentials. With password-based authentication, the client sends the password to the server over the encrypted channel. However, this is vulnerable to brute-force attacks — an automated system can try common passwords, or various combinations of letters, words and names against your server.
With key-based authentication, you use “asymmetric encryption” and “challenge-response authentication” to authenticate users. Simply put, you generate two mathematically related keys, called “public” and “private” keys. Then, you copy the public key to the server, but you keep the private key on your local machine, safely guarded from others. Due to how these keys work, you can encrypt data only with the public key, and decrypt data with the private key.
When you authenticate, the server uses the public key to encrypt a random number and sends it to the client. The client then “proves” that it has the private key by decrypting the number and sending it back to the server. The server then matches the numbers, and the authentication is completed. Because the client needs to prove itself in this way, this method is secure against any brute-force attacks.
SSH also uses asymmetric encryption to establish the encrypted connection, but this process is separate from key-based authentication. The server uses a separate public and private key to establish this connection. Also, as SSH key pairs are used to authenticate users on a server, each user will have their own public and private keys for this purpose.
Generating a SSH key pair
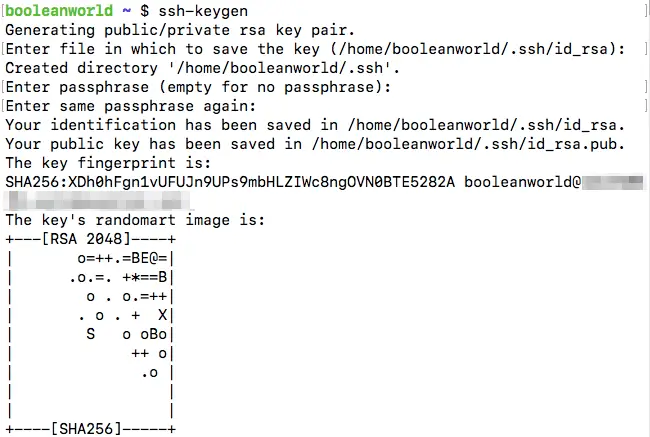
OpenSSH comes with a tool called ssh-keygen to generate key pairs. By default, it uses 2048-bit RSA keys, although this can be changed (more on that later). We will generate our first key pair with the command:
ssh-keygenWhen you run this command, it will ask you where you want to save the key. By default, the private key is saved to ~/.ssh/id_rsa and the public key to ~/.ssh/id_rsa.pub. If you want to change the location, you can enter a custom path.
In addition, to better protect your private key, it will also ask for a passphrase. If you use a passphrase, it will be used to encrypt the generated private key. In this way, even if someone managed to steal your private key, you would be safe as they would need to decrypt the private key with the passphrase, to use it. However, for the purposes of this article, we won’t use a passphrase by leaving the field blank.
Now, you can verify that these files have been created, by running:
ls ~/.sshThis lists out the two files:

You can also save the key pair to a custom location with the -f switch. If you run:
ssh-keygen -f ~/my-keyThe private key would be in ~/my-key and the public key would be ~/my-key.pub.
(Optional) Choosing the SSH key type and size
In the previous section, we have seen that ssh-keygen generates 2048-bit RSA keys. This key format strikes a balance — it is compatible with most systems, and it is also secure enough for most purposes. However, you may want to choose a different key type or key length, depending on your use case.
OpenSSH supports several types of keys — DSA-, RSA-, ECDSA- and Ed25519-based keys. The main advantage of using ECDSA/Ed25519 keys over DSA/RSA keys is that they can provide the same level of security with much smaller keys. However, older versions of OpenSSH do not support ECDSA/Ed25519 keys. In addition, DSA has been deprecated in modern OpenSSH versions due to vulnerabilities, and various concerns exist about the security of ECDSA. This only leaves RSA and Ed25519 as practical choices.
You can change the key type using the -t option. For example, if you want to create a Ed25519 key, you would simply use:
ssh-keygen -t ed25519By default, these keys will be written to ~/.ssh/id_ed25519 and ~/.ssh/id_ed25519.pub, although you can change the filename to something else.
Similarly, you can explicitly state that you want a RSA key by using:
ssh-keygen -t rsaIf you want a different key size, you can specify it using the -b option. RSA keys can vary from 1024 to 16384 bits, and Ed25519 keys can vary from 256 to 16384 bits. As an example, if you want a 4096-bit RSA key, you should use:
ssh-keygen -b 4096Copying the public key to the server
Now that you have generated the key pair, you should copy the public key over to the server. Because public keys are used to authenticate a given user, the key lives in ~/.ssh/authorized_keys, for that user. In addition, this file should have the permission bits 400, so that other users aren’t able to read the file.
Most versions of OpenSSH come with the ssh-copy-id command, which can be used to automate this process. Let us assume that you’ve generated the public key in the default path. Now, if you want to copy the public key for the user booleanworld to the server 192.0.2.16, you should use:
ssh-copy-id [email protected]However, if you have the key saved in a different location, you can use the -i switch to manually set the path:
ssh-copy-id -i ~/my-key.pub [email protected]If you’re using a very old version of OpenSSH which doesn’t have this command, you can manually run this process. First, create the ~/.ssh directory for the user and set the permissions:
ssh [email protected] 'mkdir -p ~/.ssh; chmod 700 ~/.ssh'Next, copy the public key into ~/.ssh/authorized_keys with scp. We will assume that you have the key in ~/.ssh/id_rsa.pub, which is the default location. So, to copy the file, run:
scp ~/.ssh/id_rsa.pub [email protected]:~/.ssh/authorized_keysFinally, you can set the permissions of the key with another SSH command:
ssh [email protected] 'chmod 400 ~/.ssh/authorized_keys'Using the SSH key to log in
Now that you have installed the key on the server, it’s time to log in. If you have the key in the default location, you simply need to log in as usual:
On the other hand, if you have the private key in a custom location, you should set the path with the -i switch:
ssh -i ~/my-key [email protected]If everything worked well, you should be able to log in without a password. However, if you opted for a password-protected private key, ssh will ask you for a password to decrypt the key, like so:

With the setup we have so far, you will be able to log in to your user account, either using a password or the private key. This doesn’t help with security since automated systems can still run brute-force attacks. Thus, in the next section, we will disable password authentication in the SSH server.
Before you continue any further, you should ensure all users who want to log in to the server have a public key configured on the server.
Disabling password-based authentication
To disable password authentication, you should edit the /etc/ssh/sshd_config file on the server. Here we’ll be using the nano editor, although you can use any other editor of your choice. If you are logged in to the server as a root user, run:
nano /etc/ssh/sshd_configOtherwise, most systems have sudo to enable you to run commands as the root user, so you can use:
sudo nano /etc/ssh/sshd_configHowever, if you do not have sudo installed, you can get a root shell by running su and entering the root user’s password. Then, you can use the commands for the root user as above.
Once you open the file, find the line containing the “PasswordAuthentication” directive. This line will typically look like:
#PasswordAuthentication yesIf there is a # in front of the “PasswordAuthentication” line, you should remove it. Then, change the yes to a no, and then save the file and exit the editor. However, if there is no such line, you can simply add the following line to the end of /etc/ssh/sshd_config:
PasswordAuthentication noOnce you’ve saved the file, you should restart the SSH server with the following command:
sudo service sshd restart # For older sysvinit/upstart systems
sudo systemctl restart sshd # For modern systemd-based systems
Now, we will check if password-based authentication still works. To do so, you should tell SSH to only use password authentication; otherwise, SSH always tries to use the keys (if you have them in the default location):
ssh -o PreferredAuthentications=password [email protected]The server should reject the authentication attempt with an error similar to:

Managing multiple SSH keys
If you have multiple SSH keys for multiple servers, you have to remember the server and its corresponding key, which can become a hassle. You can specify a list of servers and keys in the ~/.ssh/config file on your local system.
As an example, if you want to configure SSH to use ~/ssh-keys/server1 when logging into 192.0.2.16, and ~/ssh-keys/server2 when logging into 192.0.2.34, you should use:
Host 192.0.2.16
    IdentitiesOnly yes
    IdentityFile ~/ssh-keys/server1

Host 192.0.2.34
    IdentitiesOnly yes
    IdentityFile ~/ssh-keys/server2
Now, when you try to log in to any of these two servers with the ssh <username>@<host> command, SSH will automatically use the key defined in the configuration file. For any other server, it will fall back to the default keys or password authentication (depending on server support and the default key in use).
Changing the passphrase of a SSH key
Previously, we’ve seen how you can generate public and private keys. If you want to add a passphrase to an unencrypted private key, or you want to change the passphrase for an encrypted private key, you can do so by using the -p flag in ssh-keygen like so:
ssh-keygen -pf <path to SSH private key>If you run this on an unencrypted key, ssh-keygen should ask for the new password (like the example below). Likewise, if you have an encrypted key, ssh-keygen should ask for the old and new passphrases.

Once you’ve added or changed the passphrase on a key, you can log in with the usual ssh command.
If you have OpenSSH version 6.5 or later installed on your local system, you can opt to encrypt the key with a more secure password encryption format by using the -o flag. You can confirm the OpenSSH version on your system using:
ssh -VIf you have the required OpenSSH version, you can use the -o flag to encrypt the key as follows:
ssh-keygen -opf ~/.ssh/id_rsaRemembering private key passphrases with ssh-agent
If you have a lot of passphrase-protected keys, having to type in the passphrase every time you want to log in to a server is a bit of a pain. Fortunately, OpenSSH comes with a program called ssh-agent, which can temporarily remember passphrases for you.
Before you can ask ssh-agent to remember passphrases for your keys, you should first start it up. MacOS and many Linux distributions already do this for you. A simple way to confirm if your OS does this is to look for the ssh-agent process using:
pgrep -u $USER ssh-agentIf this command doesn’t print anything, this means that your OS doesn’t start ssh-agent by default. So, you should add the following snippet at the end of your ~/.bashrc file:
if ! pgrep -u "$USER" ssh-agent > /dev/null; then
    ssh-agent | grep -Ev '^echo ' > ~/.ssh-agent-vars
fi

if [[ ! -z "$SSH_AUTH_SOCK" ]]; then
    . ~/.ssh-agent-vars
fi
This will start ssh-agent whenever you launch a terminal, if it isn’t already running in the background. However, this change will work only for any new terminal windows that you open.
Now, suppose you have a key in ~/.ssh/id_rsa, and you would like ssh-agent to remember the passphrase for it. Type in the following command to do so:
ssh-add ~/.ssh/id_rsassh-add will ask for the passphrase for the key. Once you enter the passphrase and hit enter, ssh-agent will remember it till you shut down your computer. Now, you can try logging in as usual with ssh <user>@<host> and you won’t be prompted for the passphrase for the key.

However, this process leaves a lot to be desired. Every time you turn on your computer and want to log in to a new server, you have to use ssh-add so that ssh-agent “remembers” the passphrase for the key. If you forget this step, ssh will ask for the passphrase later as well.
OpenSSH 7.2 and later versions make this process seamless — you can configure it so that there’s no need to separately run ssh-add. If you’re using ssh and use a key that ssh-agent doesn’t know about, you need to enter the passphrase as usual. Once you enter the passphrase, ssh-agent will automatically save it and ssh won’t ask you about the passphrase later on.
If you have OpenSSH 7.2 or later, you can add this snippet to the ~/.ssh/config file to enable this feature:
Host *
    AddKeysToAgent yes
Conclusion
SSH key-based authentication provides a secure way of authenticating to a server. It significantly improves the security of your server by preventing brute-force attacks. Further, you can use a passphrase to encrypt the private key, so that the key can’t be used even if it is leaked to third-parties.
Although we have discussed everything with regards to the ssh command, the same steps are also applicable for other commands in the OpenSSH suite, such as scp and sftp.