Creating Linux Apps That Run Anywhere with AppImage

Most Linux distributions allow users to install software by using a package manager. Unfortunately, this system leads to quite a few rough edges. If you’re a user using a “long term support” version of a distro, you’re often stuck with older packages. For app developers, it’s even more frustrating – updates often don’t make their way to the distros. If you’re developing a new app, you have to get your package into many different repositories, or you could build packages for the major ones and hope nobody uses one of those rarely used distributions.
To fix these problems, many people have proposed alternative ways to distribute software. In this article, we’re going to look at one of these methods — AppImage. Unlike some systems such as Snap and Flatpak, AppImages work with very little support from the base distribution.
What is an AppImage?
AppImage is a format to distribute an entire application as a single executable file. To run the app, an user simply needs to run this file — there’s no intermediate installation step. The application runs off this package, and it doesn’t place files on the base system. In addition, the AppImage file contains all libraries and files it needs to run, and this allows them to work on a large number of distributions.
So, how does that work? Technically, an AppImage is a ELF file that also contains an embedded filesystem — usually a squashfs filesystem. All the files needed to run the application are stored here. When you run the file, the program embedded in this file mounts the filesystem in a directory under /tmp. Then, it starts up the application inside this directory.
For security reasons, mounting a file system still needs root permissions. Fortunately, most desktop distributions have FUSE support, which makes it possible to mount file systems without root permissions. This is used by AppImage files to work seamlessly, and this is the only bit of support that they expect from the base system.
Because AppImage files are so easy to distribute and run, they’ve been adopted by a large number of projects, such as Subsurface, MuseScore and Avidemux. The AppImage project also has a number of unofficial Appimages available for users to try out.
Now that we’ve learnt the basics, let us take a deep dive into the process of creating an AppImage file.
AppDirs and AppImageTool
In order to build an AppImages, the AppImage project provides a tool named appimagetool. It builds applications from an “AppDir”, which contains the following files:
- The files of the original application.
- A
.desktopfile that tellsappimagetoolabout the name of the application, and the icon it should use. - A PNG, SVG or an XPM icon with the name given in the
.desktopfile with theIconentry. - An
AppRunfile, which is used to start up the application inside the filesystem. Once the AppImage ELF has mounted the filesystem, it invokes this file. In theAppRunfile, you can run some initialization procedures (such as setting environment variables), and then start up the real application. - Optionally, you should also add AppStream metadata in
usr/share/metainfo.
In order to build an AppImage, first you should download appimagetool. If you’re on a x86-64 system, you can grab the latest version like so:
wget https://github.com/AppImage/AppImageKit/releases/download/continuous/appimagetool-x86_64.AppImage
chmod +x appimagetool-x86_64.AppImage
The “Hello World” example
In this section, we’ll learn how to build a basic AppImage with the classic “Hello World” example. So, for this example, our “app” is simply a shell script that prints “Hello World”. Although it’s very basic, this example will help us examine the basic structures necessary to create AppImages.
Go ahead and check out the hello-world-appimage directory for the code. In this repository:
- The
AppRunfile starts up thehelloworld.shfile. helloworld.shis the actual application that prints “Hello World!”- The
helloworld.desktopfile sets the name of the application tohello-world-appimageand the icon tohello-world-icon. Notably, other entries found in desktop files (such asExec) are unnecessary for our purposes, and we’ve left them out. hello-world-icon.pngis the application icon.
Next, download the source code for the “Hello World” application.
git clone https://github.com/boolean-world/appimage-resources
cd appimage-resources
Then, we’ll build the AppImage from the contents of this directory. Replace the path below with the actual location where you’ve saved appimagetool.
/path/to/appimagetool-x86_64.AppImage hello-world-appimage/You’ll find that an executable named ./hello-world-appimage-x86_64.AppImage has been created. When you run this file, you’ll get the expected output of “Hello World!”.
In the next section, we’ll look at practical examples of building AppImages.
Packaging a real application
The example we saw previously is fairly simple. However, packaging a real application isn’t that simple. There are a number of factors you should take into account when building an AppImage for something more practical.
For example, on other OSes such as Windows and Linux, there’s a notion of a “base system” — an installation of these OSes provides high level functionality by default, such as GUI and media handling libraries. On the other hand, Linux systems don’t share this concept. An installation of Linux might just be the kernel, an init system and a shell.
You probably wouldn’t want to support something that’s so minimal, though. For example, for packaging a GUI application, you might take a very old distribution that’s still supported. Then, you can install a very minimal desktop environment/window manager and define that as the base system to target.
In addition, running an application from inside an AppImage is a lot different than when it’s installed on your system. For example, a GUI torrent client might depend on a torrent library, which is typically installed in /usr/lib. Once it’s run from an AppImage, the torrent client will fail to run because it’ll still look for it in /usr/lib. In this case, you should export LD_LIBRARY_PATH in AppRun before starting up your application. Alternatively, you can also use chrpath/ patchelf to change the rpath of the binaries.
Depending on what you’re working with, you might have to do a number of additional things. As an example, when you’re working with Qt applications, you should export QT_QPA_PLATFORM_PLUGIN_PATH so that Qt plugins work properly.
A real example: packaging qBittorrent
In order to better understand the steps we’ve previously mentioned, we’ll package qBittorrent into an AppImage. One of the quickest ways to create it would be to use the files from a pre-built package. However, in this article we’ll use the other approach: we’ll compile qBittorrent and pack up the needed files.
The steps we’ve discussed below might seem fairly tedious and daunting. However, these are just the steps you need to run to figure out what should go into the AppImage. Once you’ve completed this process, you can automate it, and you only need to check back again when something major changes or when new dependencies are introduced.
Setting up the base system
As we’ve said previously, it’s best to choose an old distro with a minimal configuration. In this example, we’ve use Ubuntu 14.04 with a minimal LXDE installation as our base system.
To make our analysis easier, we’ll want to keep track of all the different files and libraries installed during compilation. In addition, we also want to keep our base installation clean. Thus, we need a mechanism to isolate writes to a separate directory. This can be usually done by coupling a chroot or systemd-nspawn to an union file system. A very crude script that uses chroot is available here, and we’ll use this for our example.
Before we can start working in the “isolated-writes” environment, we’ll need to initialize a minimal set of devices and directories. To do so, run:
sudo ./tempenv.sh setupThen, we can start up this environment with:
sudo ./tempenv.sh startThis will mount the union file system and the minimal set of devices, and then chroot into it. Here, we’ll run the commands to install additional dependencies, such as Qt (needed by qBittorrent).
To ensure too much stuff isn’t inside this environment, we’ll install compilation tools directly on the base system:
sudo apt install gcc g++ automake libtool pkg-configInstalling packages and compiling qBittorrent
After you’ve started up the environment, you can install packages in it. We’ll use the instructions outlined here, and use Stephan Binner’s QT 5.8 PPA.
add-apt-repository ppa:beineri/opt-qt58-trusty
apt update
apt install qt58base qt58tools libboost-dev libboost-system-dev libboost-chrono-dev libboost-random-dev libssl-dev libgeoip-dev libgl1-mesa-dev
Once we’re done with installing various packages, we’ll proceed to compile and install qBitTorrent. Here, we’ve assumed you have the libtorrent (the 1.0 branch) and qBitTorrent (3.3.13) sources under your home directory.
. /opt/qt58/bin/qt58-env.sh
# Install libtorrent
cd ~/libtorrent
./autotool.sh
./configure --disable-debug --enable-encryption --prefix=/usr --with-libgeoip=system
make install
# Install qBittorrent
cd ../qBittorrent
./configure --prefix=/usr
make install
We’re done compiling and installing qBittorrent, so we’ll exit the shell here.
Cutting the fat
As you may have noticed, the writes into our “environment” have gone into the tempenv/files directory. If you look into its contents, you’ll find a couple of directories and files. This directory is the starting point for our AppDir. However, we can’t package this directory right now — there’s a lot of stuff we have to remove and add in before we can do that.
Before we do any of that, we’ll copy this directory to somewhere else, and then we’ll move in to the new directory.
sudo cp -r tempenv/files/ ~/qbittorrent.AppDir
cd ~/qbittorrent.AppDir
Despite the fact that there are a huge number of files, we can eliminate some of them through intelligent guesses. For example, we don’t need the /var, /home or /tmp directories, so we can delete them. Again, we don’t need developer documentation, tooling and libraries, so we could delete those too. Installing Qt also gives us a number of files unnecessary for our purposes, and again, they can be deleted.
sudo rm -r .unionfs* etc/ home/ var/ tmp/ opt/qt58/bin/ opt/qt58/doc/ \
                     opt/qt58/include/ opt/qt58/mkspecs/ usr/include/ \
                     usr/lib/pkgconfig/ usr/share/sgml/ usr/share/aclocal/ \
                     usr/share/bug/ usr/share/doc/ usr/share/lintian/ \
                     usr/share/man/ usr/share/pixmaps/opt-qt58-* \
                     usr/share/pkgconfig/ usr/share/freetds/ opt/qt58/examples/ \
                     usr/lib/geoip/ usr/share/applications/opt-qt58-* \
                     usr/bin/geoiplookup* usr/share/applications/mimeinfo.cache
sudo find -type f -name '*.la' -o -name '*.a' -o -name '*.prl' | sudo xargs rm
We’ve managed to trim things down by a huge margin. Unfortunately, there are quite a few files and libraries left, but we can’t decide about them directly. We’ll deal with this in the next section.
Including and removing more files by analyzing binaries
Linux distributions are configured in a great variety of ways. Despite the fact that we’ve taken a minimal install, there may still be some dependencies which won’t get included in the AppDir. Thus, the AppImage might fail on an exotic configuration. Again, as we’ve discussed previously, there are some files in the AppDir which aren’t needed. In order to find out which libraries are actually needed, we’ll ldd tool:
LD_LIBRARY_PATH="opt/qt58/lib:usr/lib:usr/lib/x86_64-linux-gnu" ldd usr/bin/qbittorrentThis gives a number of libraries we can copy into the usr/lib directory. Unfortunately, ldd can’t detect every library that a program needs. Moreover, it doesn’t say anything about the other files that may or may not be needed. For these situations, we’ll try to run the application with strace. Files not referenced when the program is running can be safely removed.
export QT_QPA_PLATFORM_PLUGIN_PATH=opt/qt58/plugins/
LD_LIBRARY_PATH="opt/qt58/lib:usr/lib:usr/lib/x86_64-linux-gnu" strace usr/bin/qbittorrent 2>&1
Since there’s quite a bit of output from strace, you could save this to a file. So, for example, if you were wondering if any of the plugins from opt/qt58/plugins were actually used by the application, you could grep this file appropriately.
You should consider running the application this way on a number of popular distributions. This will allow you to verify if things work well on other distributions as well.
After removing and adding files in this way, we ended up with a set of files which we’ve listed here.
Adding icons, desktop entries, metadata and an AppRun
Before we can create the AppImage, there are some small tasks left.
First of all, we have to add a .desktop file and an icon. qBittorrent already provides them, and we have to just copy them into the root directory:
sudo cp usr/share/applications/qbittorrent.desktop ./
sudo cp usr/share/hicolor/128x128/apps/qbittorrent.png ./
Then, we’ll add the AppStream metadata for the application. Again, qBittorrent already provides this, but it’s in usr/share/appdata instead of usr/share/metainfo. You can move or symlink the directory to the correct location:
sudo mv usr/share/appdata/ usr/share/metainfoFinally, we need an AppRun. This is fairly easy, and we’ve already seen a minimal version of it in the previous section. This is the AppRun we’ll add in. Most importantly, it uses absolute paths instead of relative ones. It also handles cases where there may already be an existing value of LD_LIBRARY_PATH.
Building the AppImage
Finally, it’s time to build the AppImage! Again, as we previously saw in the “Hello World” example, this is extremely easy to do:
cd ..
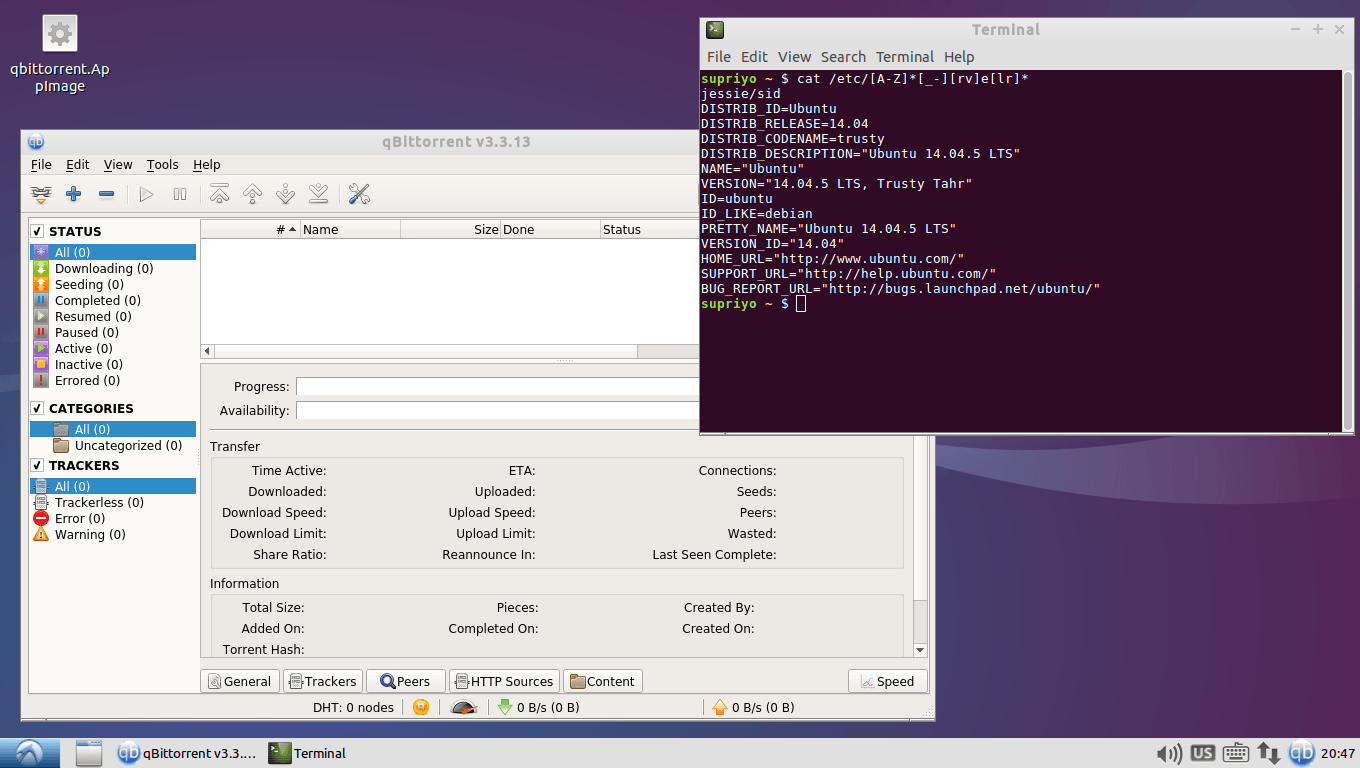
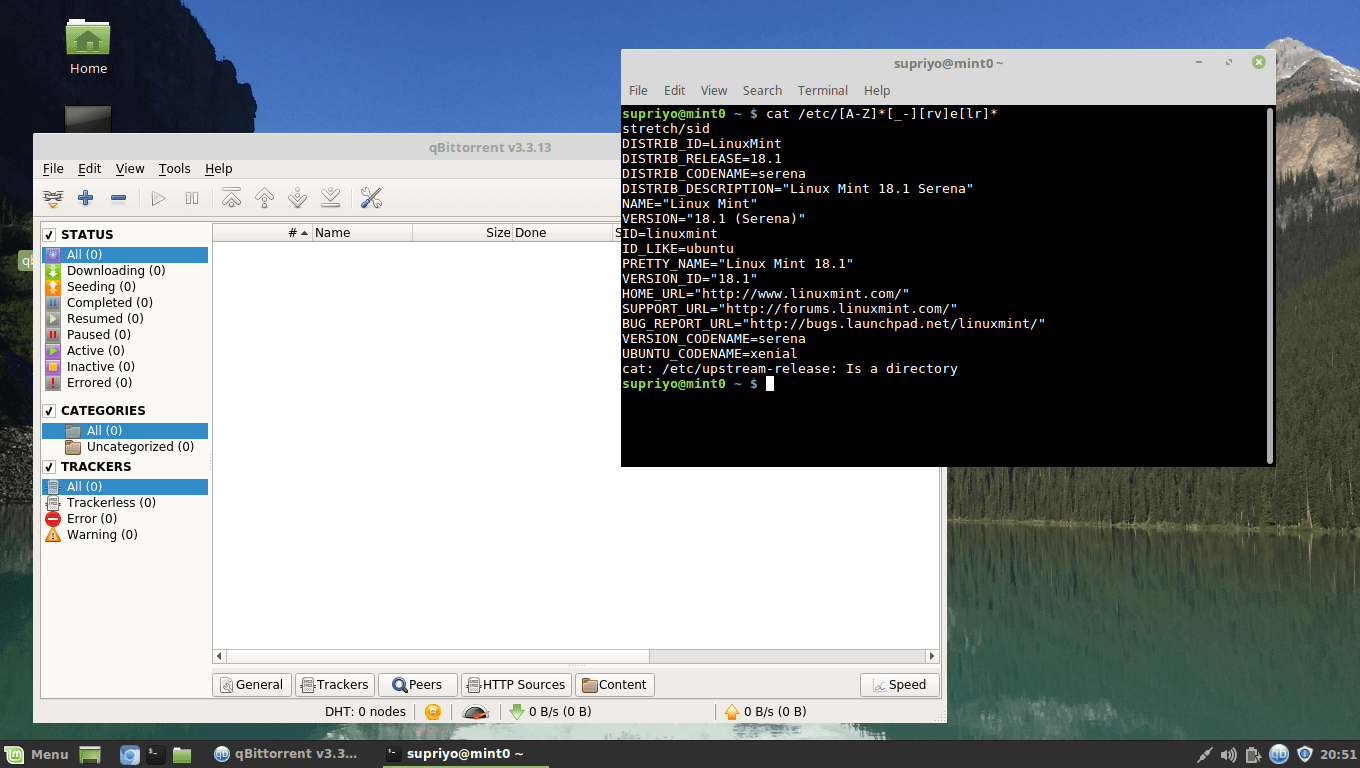
/path/to/appimagetool-x86_64.AppImage qbittorrent.AppDirFinally, we’ve obtained an AppImage of qbittorrent. It works across many distributions in the exact same manner. In our case, we executed it on our base system (Lubuntu 14.04) as well as on Linux Mint and Manjaro XFCE, and it works perfectly across all of them.

Desktop integration and updates
So far, we’ve seen how AppImages provide cross-distribution compatibility. Unfortunately, this is also their biggest weakness over a traditional package manager based approach. Because an AppImage is self contained, it can’t provide desktop integration through desktop entries. Also, a vanilla AppImage doesn’t provide a nice way to update it.
The developers of AppImage have noticed this, and they’ve come up with some solutions. The project has a number of recipes for building AppImages, and they use a “desktop integration wrapper script”. Simply put, the AppRun starts up a script instead of the real application. This script then asks if the user would like to create a desktop entry. If the user agrees, the script puts a modified version of the embedded desktop entry into ~/.local/share/applications. Finally, the script starts up the real application.
Alternatively, users can install appimaged, an optional daemon that watches the user’s downloads directory. When the user downloads a new AppImage here, it automatically registers it with the system.
For updates, there’s AppImageUpdate — it’s an external program that updates AppImages from the metadata embedded in them. It’s a completely decentralized way of distributing updates, and it uses delta updates to minimize bandwidth usage.
Conclusion
In this article, we’ve learnt what an AppImage is, how they aim to solve problems in Linux software distribution, and how you can build AppImages for your own applications. AppImages provide a nice user experience, and they bring Linux closer to MacOS and Windows in terms of ease-of-use.