Adding HTTPS to Your Website with Let's Encrypt
HTTPS is an important part of securing websites. In our previous article, we’ve discussed how to add HTTPS to your website with Cloudflare. Unfortunately, for all intents and purposes, CloudFlare’s HTTPS is just an intercepting proxy sitting between your server and the client. In addition, it won’t work at all if you’re serving a website with a dynamic DNS service.
Let’s Encrypt is a new and completely automated Certificate Authority (CA) which provides Domain Validated (DV) certificates for your domain for free. In this post, we will show you how you can obtain and deploy Let’s Encrypt certificates and deploy them for servers such as Apache and nginx. These instructions should work on any Linux distribution, including popular ones such as Ubuntu, Debian and CentOS.
Installing Certbot
The first step with any Let’s Encrypt deployment is to install a client that verifies that you own the domain and sets your server up to serve files. There are many clients for this, but we’re going to use the official client, Certbot.
Unfortunately, most distros don’t carry Certbot or carry old copies of it. We’re going to use the latest version that’s available on EFF’s website. Download it and make it executable like so:
wget https://dl.eff.org/certbot-auto
chmod +x certbot-auto
Then, move it to a standard location from which it will be accessible, such as /usr/bin:
mv certbot-auto /usr/binThat’s it — you’ve installed Certbot! It can automatically bootstrap itself and install any required dependencies.
Deploying HTTPS on Apache and nginx
Now that we’ve installed certbot, we’ll take a look at how to deploy HTTPS. Fortunately, Certbot has plugins for Apache and nginx, making it a breeze to set things up.
Depending on the webserver you’re using, you simply need to run its plugin. So, for Apache, you should run:
sudo certbot-auto --apacheFor nginx, you should run:
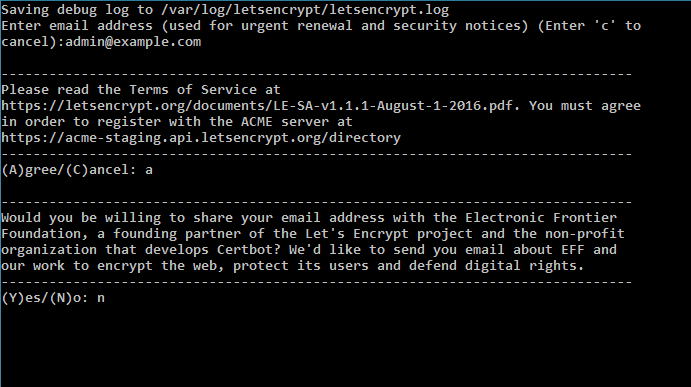
sudo certbot-auto --nginxcertbot-auto will now bootstrap itself by installing the necessary packages and downloading some necessary code. When it’s done, you will be asked for your email address and to agree to the terms of service.
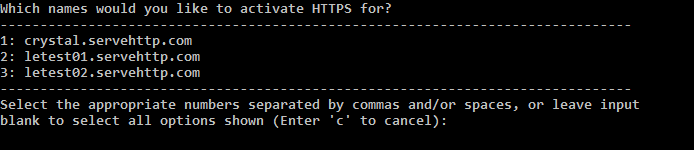
Then, you’ll be asked to select a website to deploy HTTPS for. (Certbot gets this list by looking at your server configuration.) Leave the field blank if you want to deploy for all of them, or you can deploy it for a specific set of sites by entering the numbers from the list.
If Certbot can’t find the name of your website, it’ll ask you to type it in.

After you type in the server names, Certbot will now complete a challenge given by the server to prove that you indeed own the domain. Once it is complete, Certbot will make the necessary changes to your server configuration to deploy HTTPS. You can find a list of files changed in the output:

Finally, you need to select if you want to redirect all traffic to HTTPS by default. Select the option that suits your needs best, and hit Enter.
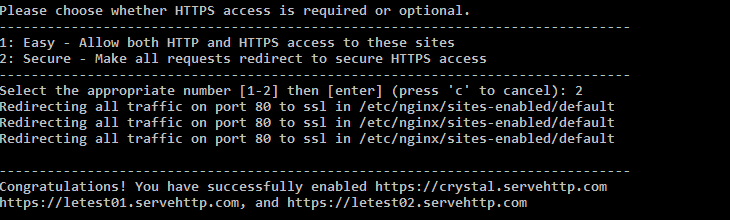
Now, you can visit your website from a browser. Depending on the option you’ve selected before, you may need to add a https:// before your site’s address. If everything worked fine, you’ll find that your website now has HTTPS.
Deploying HTTPS on other web servers
It’s fairly easy to deploy HTTPS on Apache and nginx. However, what if you’re using something less common like HAProxy or cloud-torrent? Fortunately, that’s easy too. Before starting, however, be sure to stop any web servers that you’re running.
Then, run certbot-auto with the “certonly” option. It simply gets certificates but doesn’t configure your server.
sudo certbot-auto certonlyYou’ll be asked to select an authentication method. The standalone method works in all cases, so select it and hit Enter.

The rest of the setup instructions are the same as with the Apache/nginx instructions. After the setup, you can start any web servers back up. The certificate will be stored in /etc/letsencrypt/live/<your_domain>/fullchain.pem and the private key will be stored in /etc/letsencrypt/live/<your_domain>/privkey.pem. Now, you simply need to modify your server configuration to use these two files.
Renewing Let’s Encrypt certificates
Let’s Encrypt certificates are valid for 90 days, and you need to renew them before they expire. You can manually renew them with:
sudo certbot-auto renewIf you’re using the “certonly” method, Certbot won’t be aware of the software you’re using. So, it won’t have any idea about how to restart your server after a renewal. However, you can manually specify commands to be executed after a renewal. For example, if you use HAProxy, and you want to restart it after installing the certificate, you can run:
sudo certbot-auto renew --renew-hook "systemctl restart haproxy"However, having to renew them by hand again and again would get boring quickly. So, you should set up a cron job to take care of renewals automatically.
Open the crontab file for the root user with:
sudo crontab -eThe crontab file will open in a text editor. Here, you need to add this line:
30 12,6 * * * /usr/bin/certbot-auto renew 2>>/var/log/cert-renew.log >>/var/log/cert-renew.logThis command will run the certbot renew command at 6:30 and 12:30 every day. The command ignores any request to update certificates before its close to the renewal date, so running it everyday isn’t a problem. The output of the command will get logged to /var/log/cert-renew.log.
To install the modified crontab file, save it and exit the editor.
The staging environment
To prevent abuse of their system, Let’s Encrypt has limits on the rate at which they issue certificate. Thus, if you frequently obtain new certificates for testing purposes, you may be unable to obtain a certificate. In order to prevent this issue, you can use the “staging environment”. Although it gives out fake certificates that aren’t trusted by a browser, this is fine if you are writing some scripts to automate your website deployment process.
Suppose you want to automatically configure Apache with a certificate from the staging environment. Simply tack on --test-cert at the end along with the original command, like so:
sudo certbot-auto --apache --test-certIf your website deployment process involves some tests to check if your website is working correctly, these may start failing. This is because, as we previously mentioned, these certificates are not trusted by a browser. In order to work around this problem, you can import the “Fake LE Root X1” certificate available on the staging environment page.
Removing Let’s Encrypt certificates
Sometimes, you might need to remove a Let’s Encrypt certificate from a server. This may be due to a server compromise (which means your private key has possibly been stolen), or perhaps you don’t need to operate that site any more. In these cases, you can remove the certificate with the following instructions.
The first step is to “revoke” the certificate, which marks the certificate as invalid. You can do this by using the “revoke” command with the full path of the “cert.pem” file:
sudo certbot-auto revoke --cert-path /etc/letsencrypt/live/<certificate_name>/cert.pemNext, you can delete the certificate with:
sudo certbot-auto delete --cert-name <your_domain>You might wonder how revocations work, given that you are not being issued new certificates. Each Let’s Encrypt certificate contains an URL where the revocation status of certificates are maintained. Before a browser (or any other client) exchanges data over SSL/TLS, it checks this URL to see if the certificate is valid.
Conclusion
In this post, we successfully obtained a Domain Validated free SSL certificate using Let’s Encrypt. Serving your website over HTTPS provides security (and SEO!) benefits and it’s a no-brainer these days. If you have any questions, do ask us in the comments below.