Building Cross-Distribution Linux Applications with Flatpak
Fragmentation has been a problem for quite some time in the Linux ecosystem. A variety of distributions exist today, with their own package managers and their own notions of what a “base system” consists of. This is tedious for application developers — after building distribution specific packages and maintaining repositories, they have to fix any distribution-specific bugs that may arise. Also, unlike mobile platforms such as iOS and Android, Linux applications run unsandboxed with access to all functionality on the base system.
To tackle these problems, a wide variety of solutions have been proposed. In this article, we will take a look at Flatpak — a way to distribute applications and run them in a restricted sandbox.
What is Flatpak?
Flatpak is a technology for building, distributing, installing and running applications, primarily aimed at the Linux desktop. It allows applications to bundle dependencies and ship with runtimes, so that applications don’t end up depending upon the quirks of a particular distribution. In addition, it increases the security of Linux applications by isolating them into sandboxes.
The architecture of a Flatpak application is as shown in the diagram below:
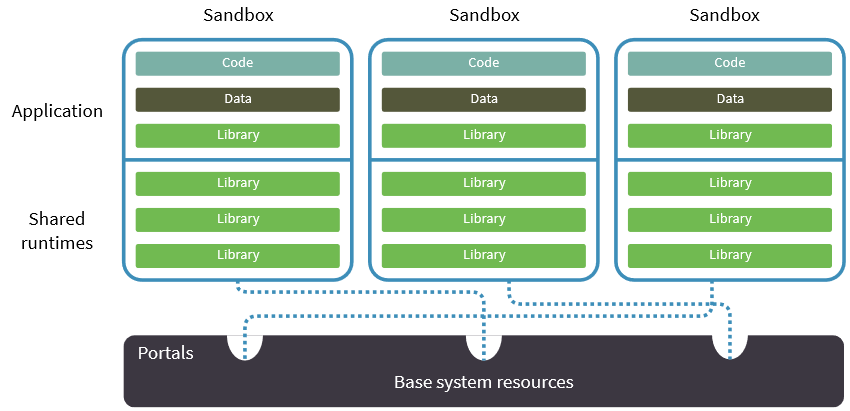
Every Flatpak application is backed by a “runtime”, which contains the basic dependencies used by applications. These runtimes are shared among applications. Multiple runtimes, and even different versions of the same runtime can coexist on a system at the same time. In this way, applications have a fairly consistent base system to rely on.
In order to build applications for this runtime, special runtimes called SDKs (Software Development Kits) are provided. They contain tools such as compilers and development headers. If your application depends on libraries not bundled in the runtime, you must compile them with the SDK, along with your application.
In addition, there are “extensions”, which are optional add-ons for runtimes and applications. They are most often used to separate out translation and debugging information from the original runtime or application.
One of Flatpak’s aims is to increase the security of applications by isolating them from one another. By default, Flatpak provides very limited access to the host system’s resources. Unless explicitly requested, applications are not permitted to use the network, access files on the base system, or talk to services such as X, DBus or Pulseaudio. In addition, “portals” allow selective access to resources through high-level APIs.
Installation, Flatpak commands and naming conventions
Flatpak is available in the repositories of most distributions. On Arch Linux and Fedora, you have to install the flatpak package to install the flatpak command, which helps you to install and build applications.
sudo dnf install flatpak # Fedora
sudo pacman -S flatpak # Arch
Ubuntu users don’t have it in the default repositories, so installing it is a bit more involved. First, you have to add this PPA to your system:
sudo add-apt-repository ppa:alexlarsson/flatpakThen, you can install the package with:
sudo apt update
sudo apt install flatpak
While the flatpak command can certainly help you to build applications, it isn’t the most convenient way. There is another tool, named flatpak-builder, which allows you to build Flatpak applications from a JSON file. (We will discuss this tool later in this article.) You can install this tool with:
sudo dnf install flatpak-builder # Fedora
sudo pacman -S flatpak-builder # Arch
sudo apt install flatpak-builder # Ubuntu
Now, in order to install applications or runtimes, you have to add repositories to Flatpak’s list of remotes. These remotes can be hosted in a local directory, or online. Runtimes/applications are identified using an inverse DNS address, like com.booleanworld.foo. In some circumstances, you may also need to specify the architecture and the “branch” of the runtime. This is done with help of a slash-separated triplet, like com.booleanworld.foo/x86_64/1.3.
The flatpak command usually adds software and repositories for all users. However, this is unsuitable for trying things out, so we will use the --user flag to restrict such changes to the current user only.
Now that we have the basics in place, we will take a look at some theory on building Flatpak applications.
Flatpak application structure
When you bundle an application with Flatpak, the following directory structure is automatically created:
metadata: This file contains information about the SDK and runtime the application will run on, as well as a list base system resources that the application needs to access.files: This directory contains files that make up the application, including any application data. Thebinsubdirectory within here contains the application executables.export: This directory contains any files that the base system needs to access. Examples include AppStream data, the.desktopfile and the application icon. Any files you put here should be prefixed with the identifier. For example, a desktop file may have the namecom.booleanworld.foo.desktop.
While you could build this structure by hand, this is not necessary. Flatpak has tools to help you automatically create this structure, and it requires very little configuration if you have a typical autotools-based project. With non-autotools based projects, you usually need to set the “prefix” directory to /app to get things up and running.
Prerequisites
The following sections of the article has a few examples of building Flatpak applications. As we have mentioned previously, applications need a runtime to run and a SDK for the build process. Thus, the first step is to add a repository from which they are available. We will add the repository available on sdk.gnome.org for our use.
flatpak remote-add --from gnome https://sdk.gnome.org/gnome.flatpakrepo --userIn order to build the examples below, we need two runtimes: org.freedesktop.Platform and org.gnome.Platform, and two SDKs: org.freedesktop.Sdk and org.gnome.Sdk. Here, we have used versions 1.6 and 3.24 of the Freedesktop and Gnome runtime/SDK.
flatpak install --user gnome org.freedesktop.Platform/x86_64/1.6 \
                             org.freedesktop.Sdk/x86_64/1.6 \
                             org.gnome.Plaform/x86_64/3.24 \
                             org.gnome.Sdk/x86_64/3.24
Next, check out the flatpak-resources repository, which contains all the resources needed to follow through this article.
git clone https://github.com/boolean-world/flatpak-resources
cd flatpak-resources
We will take a look at two examples of building applications in the following sections.
Building “kitten”, a lightweight “cat”
In this section, we will learn how to build a basic Flatpak application. The application is a tiny version of the cat command, named kitten.
First, you have to create the directory structure we have discussed earlier. The build-init command can do this for you. You need to give it a build directory, the name of your application, and the SDK and runtime to use (in that order). You can also add an optional “branch name”, but we will leave it out in this example.
flatpak build-init kitten-build com.booleanworld.kitten  \
                                org.freedesktop.Sdk \
                                org.freedesktop.Platform
As we mentioned previously, the prefix directory of Flatpak applications is /app, and you need to create the bin directory in it. When you want to run a command within the build directory, use the build command:
flatpak build kitten-build mkdir -p /app/binThe next step is to compile kitten.c with gcc:
flatpak build kitten-build gcc kitten.c -o /app/bin/kittenThen, you can complete the build with build-finish. The command will be kitten, and it needs to access the host’s filesystem (so that you can view any file on the host system). So, you can complete the build with those parameters set:
flatpak build-finish kitten-build --filesystem=host --command=kittenNow, if you want to test the application, you have to install it. The first step is to export the application into a local repository. In our example, the repository folder is my-repo:
flatpak build-export my-repo kitten-buildNext, we will add the repository with the name test-repo. Since we are not using GPG signatures, we will let Flatpak know with the --no-gpg-verify switch.
flatpak remote-add --user --no-gpg-verify test-repo my-repoFinally, you can install it with:
flatpak install --user test-repo com.booleanworld.kittenNow, you can test if it works by running it like so:
flatpak run com.booleanworld.kitten ~/.bashrcIf you’ve correctly followed all the steps so far, this should display the contents of your .bashrc file:
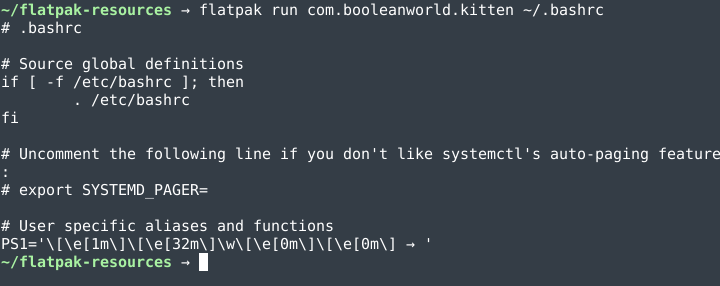
Congratulations on building your first Flatpak app!
The steps have been fairly simple so far, but the build-finish command warrants further discussion. This is what we are going to do in the next section.
A deeper look into the “build-finish” command
One of Flatpak’s primary goals is to sandbox applications and provide only minimal access to the host system’s resources. In the previous example, we allowed the “kitten” app to access any file on the system with build-finish. The switches you can use to allow access to various resources are listed below:
--filesystem={path}
This switch allows access to specific paths on the system. You can provide a specific path (such as /usr/share). home allows access to the user’s home directory, and host allows access to all files on the system. In addition, you can also make a path read-only with :ro. For example, --filesystem=/usr/share:ro --filesystem=home allows read-only access to /usr/share and read-write access to the user’s home directory.
--share={type}
This switch allows access to particular resources. The most commonly used types are ipc and network, which allow IPC and network access. In most GUI applications, --share=ipc is used for X shared memory to work, which improves performance.
--socket={type}
This switch allows you to use particular sockets. The most commonly accessed socket types are x11, wayland and pulseaudio. The first two are used by applications to render GUI elements, and the latter is used to play audio through the Pulseaudio daemon.
--device={device}
This allows applications to selectively access some devices. Most often, dri is used here so that applications can use OpenGL rendering.
--talk-name={name}and--system-talk-name={name}
These switches allow applications to talk to named services through session bus and system bus of DBus.
--env={varname}={value}
The env switch allows you to export environment variables. {varname} is the variable name, which is set to the given {value}.
If an application requires access to dconf, you must use the following switches:
--filesystem=xdg-run/dconf
--filesystem=~/.config/dconf:ro
--talk-name=ca.desrt.dconf
--env=DCONF_USER_CONFIG_DIR=.config/dconf
We will see a practical example involving these switches in a later section.
Building applications automatically: flatpak-builder
Although the steps involved in building Flatpak applications are fairly simple, it is still tedious to build them step-by-step. flatpak-builder is a tool that allows you to build applications declaratively with a JSON manifests. As long as the source code is laid out according to the “build API”, the builder can compile and install applications from the source archives. Most autotools based software already conform to the API, so no further configuration is usually needed.
A typical manifest file usually looks like this:
{
  "app-id": "com.booleanworld.kitten",
  "runtime": "org.freedesktop.Platform",
  "runtime-version": "1.6",
  "sdk": "org.freedesktop.Sdk",
  "command": "kitten",
  "finish-args": [
     "--filesystem=host"
  ],
  "modules": [
    {
      "name": "kitten",
      "sources": [
        {
          "type": "archive",
          "url": "https://opensource.example.com/kitten-0.0.1.tar.gz",
          "sha256": "38ecfd39b76a2505376f5a57ebcc7b19d35efaf9f8c724a24382c45aa1378018"
        }
      ]
    }
  ]
}
As you can see, this file contains the same information we had specified earlier with various commands. In addition, it contains a list of modules to build. In the example above, there is only a single module. If you have a complex application that depends on multiple modules, you would have to list all of them. For example, gnome-calculator depends on mpc and mpfr, and the manifest looks like this.
Different source types are supported. Another popular source type is git, and you have to provide the repository URL and optionally, the branch which must be checked out.
The manifest is very powerful, and it supports setting CFLAGS/CXXFLAGS, renaming files for export, and removing unnecessary files. In the next section, we will analyze a practical application, and learn how to package it for Flatpak.
A real example: packaging galculator
In this section, we will take galculator, a simple calculator application and build it with flatpak-builder. We need to perform a bit of analysis to find out which files need to be renamed or deleted. Thus, as a first step, we will make a test installation. Then, we can build the manifest as necessary.
Since galculator is a GTK application, we will use the Gnome runtime and SDK. You should install them now if you haven’t already done so. In addition, you should download the source archive from here. (We have used version 2.1.4, which is the latest version at the time of this writing.)
Finding files that should be exported/deleted
Once you have downloaded and extracted the source archive, you should try to build it using the SDK. The Gnome SDK also contains tools like bash, so you can start that up by using:
flatpak run --command=bash --filesystem=host --devel org.gnome.Sdk/x86_64/3.24Now, move into the galculator source directory and use the regular incantation to build it. We will set our prefix directory to ~/galculator-test.
./configure --prefix=$HOME/galculator-test
make install
Now, you can explore the files in the galculator-test directory. As you can probably tell, the following files need to be exported:
- AppStream information in
share/appdata/galculator.appdata.xml - Icons in
share/icons - The desktop entry in
share/applications/galculator.desktop
Unfortunately, they are not prefixed with the application name. Thus, you have to rename them with the following properties in the manifest:
{
	"rename-appdata-file": "galculator.appdata.xml",
	"rename-icon": "galculator",
	"rename-desktop-file": "galculator.desktop"
}
Once these files are renamed, flatpak-builder will automatically export them. Once the Flatpak package is built, this will help in creating menu entries on the base system.
In addition, the share/man and share/pixmaps directories are not necessary, so you can remove them with:
{
    "cleanup": [
        "/share/man",
        "/share/pixmaps"
    ]
}
Configuring the sandbox
Since this is a GTK application, you must allow it to access X11 and Wayland, and share IPC mechanisms. You also must allow it to use OpenGL rendering. In addition, galculator needs access to dconf, and you have to add in the entries we discussed earlier. The switches, which would have been passed to build-finish are listed in the finish-args property in the manifest:
{
    "finish-args": [
        "--share=ipc",
        "--socket=x11",
        "--socket=wayland",
        "--device=dri",
        "--filesystem=xdg-run/dconf",
        "--filesystem=~/.config/dconf:ro",
        "--talk-name=ca.desrt.dconf",
        "--env=DCONF_USER_CONFIG_DIR=.config/dconf"
    ]
}
Completing the manifest
At this point, you have configured most of the important parts of the manifest. Configuring the rest should be fairly easy, and the final manifest we used is here. We have added a set of build-options, which sets CFLAGS and CXXFLAGS to -O3.
Building and testing the application
Finally, we can build the application. Simply run flatpak-builder with a build directory and the manifest. In this example, galculator is the build directory and org.mnim.galculator.json is the manifest file.
flatpak-builder galculator org.mnim.galculator.jsonNext, export it into the repository like we did previously:
flatpak build-export my-repo galculatorNow, you can test the application by installing it:
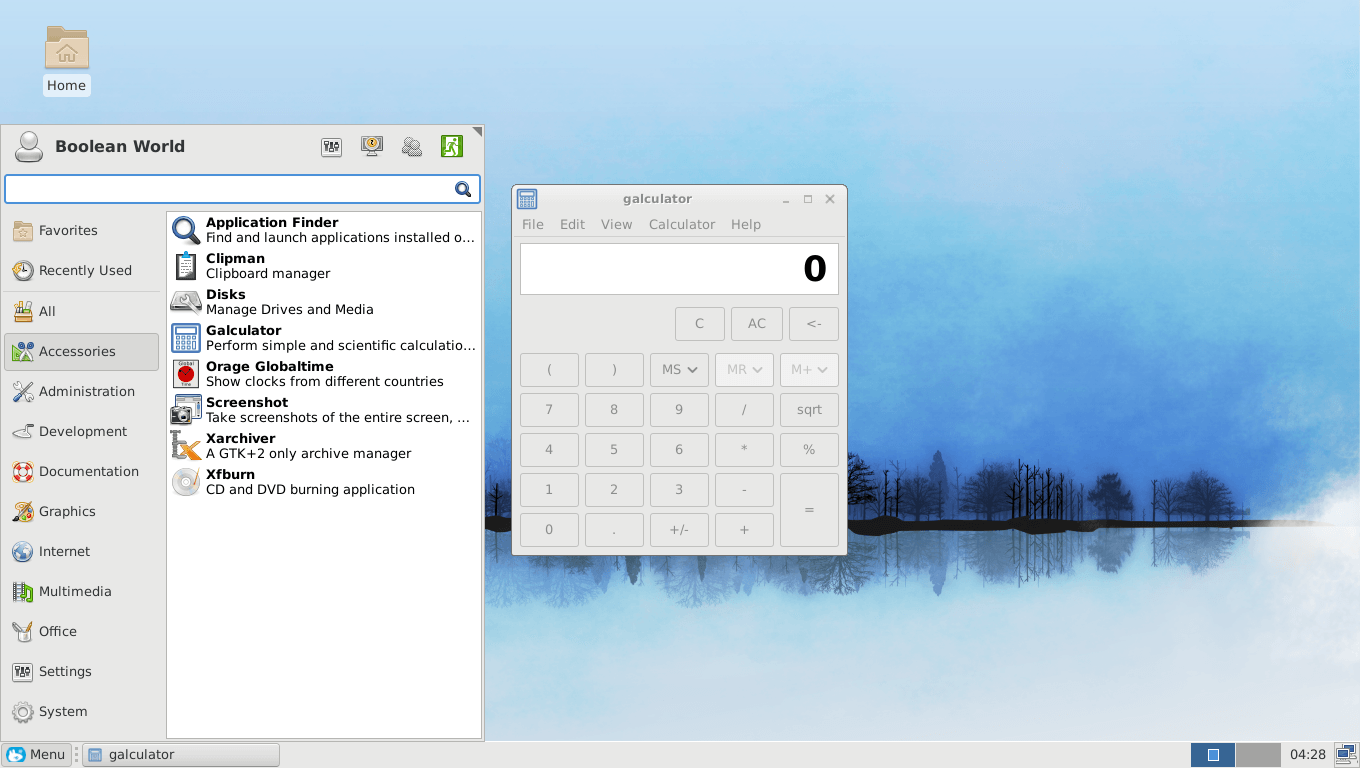
flatpak install --user test-repo org.mnim.galculatorThe application is immediately installed, and you even get desktop entries like a normal application! You can launch it from the menu entry, or run it with flatpak run as we did earlier.
Distributing applications
Now that you have built an application, how do you go about distributing it? The easiest way to do so is to transfer the repository directory on a server, and serve it over the web. Then, you can ask users to add your repository to their list, and install applications that way.
Many people prefer to install software signed with GPG, since it proves that the application indeed comes from the original maintainer. You can create GPG keys easily with the gpg2 command:
gpg2 --quick-key-gen [email protected]Make sure to note down the key ID as you will need it later. In our example, we will assume that the key ID is A318C188C20D410A.
Then, you can create a GPG-signed repository when running build-export like so:
flatpak build-export my-repo galculator --gpg-sign=A318C188C20D410AIf you have an existing unsigned repository, then you can sign it like so:
flatpak build-sign my-repo --gpg-sign=A318C188C20D410A
flatpak build-update-repo my-repo --gpg-sign=A318C188C20D410A
When you want to publish the repository, be sure to provide users with a copy of the public key. To export your public key, run:
gpg2 --export A318C188C20D410A > public.gpgYou should publish this key on your website. When your users want to add your repository, they should download the public key. If the user downloaded a key named public.gpg, they can now add the repository by running:
flatpak remote-add --gpg-import=public.gpg test-repo http://software.example.com/repo/However, this method is extremely inconvenient for users. Fortunately, you can simplify the process by creating flatpakref and flatpakrepo files, which are discussed in detail in the documentation.
Conclusion
In this article, we have learnt about Flatpak, and how you can distribute software using this new technology. It is more security oriented and features better integration and update capabilities compared to traditional methods such as AppImage.
If you are interested in reading more about this topic, the developer documentation and the flatpak-manifest man page are good places to start with. If you want to read through more complex examples of manifests/flatpakref files, take a look at the Gnome-apps repository and the Flathub examples.