Customizing and coloring the bash prompt
 If you’re already not familiar with bash, the prompt is the little blurb of text displayed when it asks for a command. It capable of communicating a lot, but most people don’t use it quite fully. Do you want to add some color to the rather bland CLI interface? Or do you need to get information like the current git branch you’re on? This article will show you how to spruce up bash’s shell prompt.
A very basic prompt
To keep things simple, let us write out a very simple prompt – we will display >>> instead of the usual prompt. Type in the following at the very end of your ~/.bashrc file:
PS1='>>> 'To see the changes in action, fire up a new terminal window, or you can type in source ~/.bashrc in an existing terminal window.
You will now see something like this:
>>> _Congratulations, you’ve just customized your bash prompt. So, how does that work? The bash prompt is controlled by a variable named PS1, and we’ve just set it to »>. Setting the PS1 variable is all you need to do to customize your prompt.
By the way, if you want to make these changes available for all users on the system, you need to use /etc/bash.bashrc (on Debian and Ubuntu) or /etc/bashrc (on other distributions) instead of ~/.bashrc.
Having that sorted out, let us see how to make more useful custom prompts.
Escape sequences
Bash allows you to use some shortcuts to retrieve details, such as the user name, the machine name, the current time, and so on. These shortcuts are called escape sequences.
Let’s say, you want to display the user’s name and the current directory, followed by a $. It can be retrieved with the \u and \w escape sequences respectively. Thus, our PS1 would look like:
PS1='\u \w $ 'This ends up looking like this:
john ~ $ _If you wanted to display the current time in addition to the other details, and display the $ on another line entirely, you could do something like so:
PS1='[\t] \u \w\n$'And sure enough, our prompt has it:
[01:13:55] john ~
$ _
The \t shows the current time, and the \n moves everything after it (in this case, the $) to the next line.
Here’s a list of the most commonly used escape sequences:
\uThe current user\wThe current working directory\WThe last fragment of the current working directory. For example, if you are currently in /usr/local/bin, this will give you bin.\hThe name of the computer, upto a dot( .). For example, if your computer is named ubuntu.pc, this gives you ubuntu.\HThe full hostname\dThe date in “Weekday Month Date” format (e.g.“Tue 21 July”)\tThe current time in 24 hour HH:MM:SS format\TThe current time in 12 hour HH:MM:SS format\@The current time in 12-hour AM/PM format\nMove on to the next line.
Adding color and styling
Most people would like some color on the rather dull shell prompt. This can be achieved with the help of ANSI escape sequences in the PS1 variable. These escape sequences need to be enclosed in \[ and \] in order to work properly.
Suppose, you want to show the username in red and the directory path in cyan, followed by a yellow, bold $ symbol. The escape sequences for red is \e[31m , for cyan, it is \e[36m, and for yellow, it is \e[33m. For bold text, we need \e[1m. In addition, we need the reset ANSI escape sequence, which prevents styles from affecting the rest of the text in the shell. The reset sequence is \e[0m.
The PS1 for this case would look like this:
PS1='\[\e[32m\u\] \[\e[36m\w\] \[\e[33m\]\[\e[1m\]$ \[\e[0m\]'The prompt ends up looking like this:
john ~ $ _There are a lot of styles and colors you can come up with. Have a look at the entire list of ANSI escape sequences to see what’s possible.
Advanced customization with command substitution
The customization discussed so far are pretty basic in nature. What if we want to do more advanced things?
It turns out that we can assign values of PS1 conditionally by using the command substitution construct. Text enclosed within a $(...) is evaluated as a command, and then, its output is put directly its place.
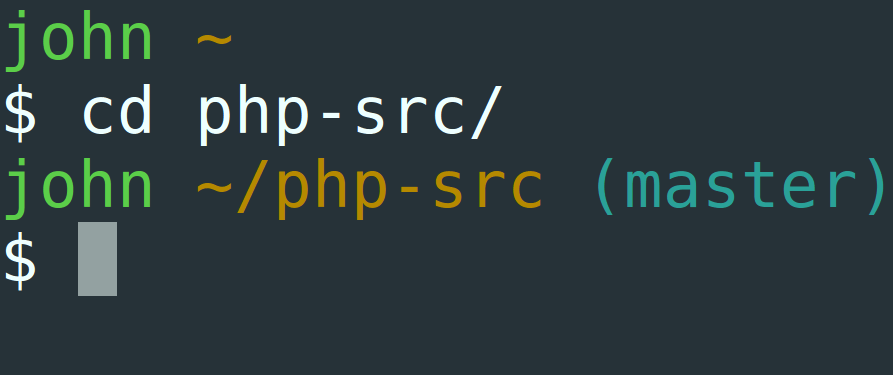
A pretty common use case would be to display the current git branch you’re on in your project directory. You can easily get the current branch with:
git branch 2>/dev/null | sed -n "s/* \(.*\)/\1/p"If you’re already familiar with command substitution, you might be tempted to write something like this:
PS1="\u \w $(git branch 2>/dev/null | sed -n "s/* \(.*\)/\1 /p")$ "However, this won’t work. This is because, the command substitution construct is evaluated at the time of reading .bashrc. When you move across directories or change git branches, the command substitution isn’t re-evaluated.
However, it turns out that if the $(...) is present as-is inside the PS1 variable, it will be re-evaluated every time the bash prompt is shown. If you’re using single quotes, it’s easy to do this:
PS1='\u \w $(git branch 2>/dev/null | sed -n "s/* \(.*\)/\1 /p")$ 'When you’re using double quotes, you need to escape the $ symbol like so:
PS1="\u \w \$(git branch 2>/dev/null | sed -n "s/* \(.*\)/\1 /p")$ "Phew! So now that we’ve sorted out how to get things working, let us see how things actually look like. When you are in a directory that is not a git repository, the prompt will appear as:
john ~ $ _However, when you are in a directory containing a git repository, the prompt will change:
john ~/my-awesome-project master $ _That was a rather simple example. However, it is possible to take this concept further and design more complex prompts.
Example: smileys on the prompt
Say, you want to display a green :) if the previous command succeeded, and a red :( if it failed. The $? variable holds the return value of the previous program — it contains a 0 if it succeeded, and a non-zero value if it failed. You could do something like:
PS1='$(if [[ $? == 0 ]]; then echo "\[\e[32m\]:)"; else echo "\[\e[31m\]:("; fi)\[\e[0m\] \u \w $ 'The $(if ... fi) block contains the logic for displaying the smileys.
The prompt does exactly what we want:
:) john ~ $ touch a.txt
:) john ~ $ rm b.txt
rm: cannot remove 'b.txt': No such file or directory
:( john ~ $
Unicode characters
Unicode is a standard way of representing text in a compatible way across various platforms. Don’t let the bit about “text” fool you though — it can even represent symbols and emojis!
To display a Unicode character in the prompt, you should first know its hexadecimal (hex) representation. Given a particular Unicode character, you can get its hex representation by using xxd or hexdump -C like so:
$ printf '✓' | xxd
00000000: e29c 93                                  ...

$ printf '✓' | hexdump -C
00000000  e2 9c 93                                          |...|
00000003
As you might have guessed from the output, the hex representation of ‘✓’ is \xe2\x9c\x93.
Now that you know the hex representation, you can display it with:
PS1=$'\xe2\x9c\x93 \u \w $ 'This will give you a prompt that looks like:
✓ john ~ $ _In the above example, note the $ followed by the single quotes. If you leave out the $ or put the PS1 content in a different type of quote, it won’t work.
If you want to display them conditionally in a command substitution construct, using printf would be the way to go:
PS1='$(if condition; then printf "\xe2\x9c\x93"; fi)'We’ll have a look at a practical example of this.
Example: we ❤ emoji
We’ll, who doesn’t love emoji? Since emojis are Unicode characters, they could be placed in the prompt too!
Let us make an emoji variant of our smiley prompt.  is represented as
 \xf0\x9f\x98\x83, whereas  is represented as
 \xf0\x9f\x98\x9c. Here’s the code for it:
PS1='$(if [[ $? == 0 ]]; then printf "\xf0\x9f\x98\x83"; else printf "\xf0\x9f\x98\x9c"; fi)\[\e[0m\] \u \w $ 'You can now bask in the glory of emoji on your terminal:
 john ~ $ touch a.txt
 john ~ $ rm b.txt
rm: cannot remove 'b.txt': No such file or directory
 john ~ $
However, depending upon the terminal emulator and the font used, you may see monochrome emoji or even garbled characters.
Customizing other prompts
Here’s something that most people don’t know — bash has other prompts, and they can be customized too! We have already seen how we can control the main prompt by setting the PS1 variable. Similarly, the PS2 variable controls the prompt that’s shown while entering a multi-line command.
The default multi-line prompt is simply a >, and you can see this by typing:
$ ls \
> -lR
Try modifying PS2 and see it in action:
$ PS2='==> '
$ ls \
==> -lR
Armed with these tricks, you can now fully customize your bash prompt!
If you’re looking for inspiration for customizing your prompt, have a look at this old revision on prompt customization and another user’s notes from the Arch Linux wiki. If you have interesting bash prompts to share, post them in the comments below!