How to Set up Basic HTTP Authentication on nginx
Files placed on a web server are publicly accessible by default. If you want to protect files from unauthorized access, you can make use of HTTP basic authentication. It is a simple authentication method, where users need to provide a username and password to access files on your server.
In this article, we will learn at how to use the basic authentication feature built into nginx. Additionally, you can combine this with other restrictions, such as allowing access from certain IP addresses.
Prerequisites
You should obviously have a copy of nginx on your system before you can configure it. In addition, you should install Apache’s htpasswd utility to generate hashed passwords. On Debian/Ubuntu systems, you can install it with:
sudo apt install apache2-utils
On CentOS, you can install it like so:
sudo yum install httpd-tools
If you’re using Fedora, simply substitute dnf for yum:
sudo yum install httpd-tools
Creating a htpasswd file
A htpasswd file contains a list of usernames and passwords. nginx uses it to check credentials of users who want to access protected areas of the website.
First, create an empty file named /etc/nginx/htpasswd like so:
sudo touch /etc/nginx/htpasswd
Now, you can add usernames and passwords to this file with the htpasswd command. For example, if you want to add an user bob to the file, run:
sudo htpasswd /etc/nginx/htpasswd bob
You will be prompted to enter the password twice. When you type the password in, there will be no feedback.
Later on, if you want to change an existing password, simply run the command again. Similarly, you can add other users to the file by running the above command with a different username.
The htpasswd file is a simple text file, and you can inspect it with a text editor. The usernames are stored as-is, but the passwords are hashed and salted. Here is a file which has two users alice and bob:
alice:$apr1$Q9qBLkLy$YQNxI8/GYuHLmoOUkbjN70
bob:$apr1$5rz0Qz20$Xuo4c3yrZRjkAk89il7Us/
If you want to remove an user from the file, use the -D switch like so:
sudo htpasswd -D /etc/nginx/htpasswd john
In the next section, we will configure nginx to use this file to restrict access.
Configuring nginx
Now, open up the site-specific configuration file with an editor like nano. If you are using Debian or Ubuntu, the site specific configuration is present in /etc/nginx/sites-available/default:
sudo nano /etc/nginx/sites-available/default
However, if you use another Linux distribution, it will be in /etc/nginx/nginx.conf:
sudo nano /etc/nginx/nginx.conf
In either case, go ahead and locate the server block. Once you have done so, add a location block for the path you would like to protect. Inside this block, you should set the realm name and the htpasswd file path. In the example below, we have restricted access for everything under files, and the “realm name” is set to Restricted. The realm name is displayed by browsers, and it is used for differentiating between different protected parts of the website.
server {
    # Many lines of configuration...

    location /files {
        auth_basic "Restricted";
        auth_basic_user_file /etc/nginx/htpasswd;
    }
}
Save the file and quit the editor. Then, to bring these changes into effect, you must reload the nginx configuration with:
sudo systemctl reload nginx
If you are on an older, non-systemd distribution, you should run this instead:
sudo service nginx reload
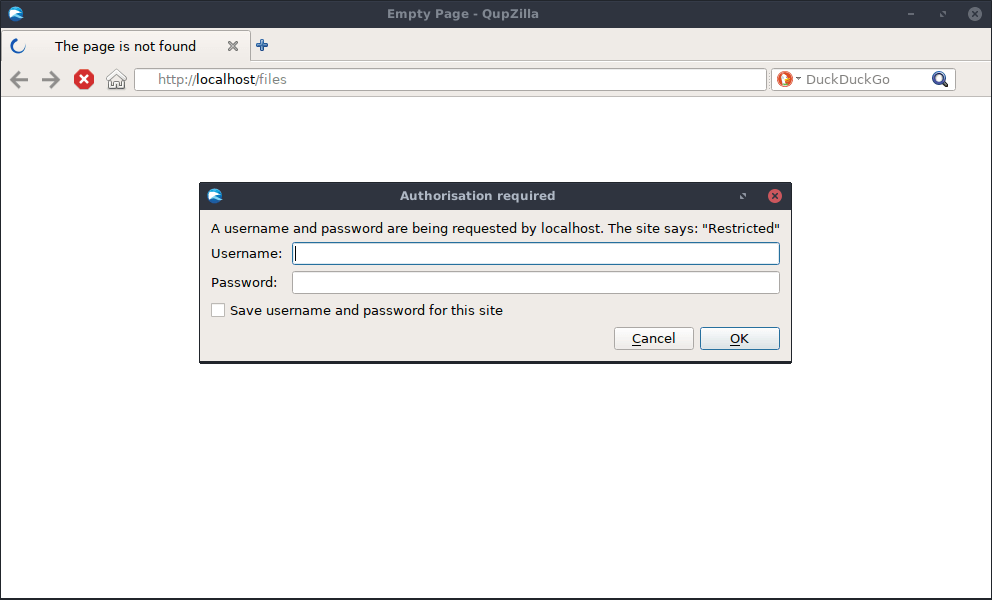
Now, if you use a web browser to access anything under /files, your browser will prompt for an username and password:
If you want to protect another path, simply add another location block with the same content:
location /photos {
    # ...
}
Keep in mind that you can also use other directives inside these location blocks.
Site-wide restriction
In the previous example, we restricted access to certain directories on the server. What if you want to place a site-wide restriction? You can do so by moving the basic authentication directives to the server block:
server {
     # Many lines of configuration...

     auth_basic "Restricted";
     auth_basic_user_file /etc/nginx/htpasswd;
}
You can also leave out certain paths by setting auth_basic to off in a location block. For example, the following block allows users to access
location /files {
    auth_basic off;
}
Combining basic authentication and other restrictions
So far, we have seen simple examples of basic authentication. nginx supports a wide variety of restrictions, and it is possible to combine them in various ways. In this section, we will consider an interesting case: combining IP restrictions with basic authentication.
Say, you have a section on your website meant for use by company staff. Any employees accessing the web server from within the network can access a page without using a password. However, if they try to access it over the Internet, they should use a password.
This means we need to have two restrictions: an IP restriction and a basic authentication directive. We have already seen how to specify basic authentication directives. IPs can be allowed or blocked by using the allow and deny directives. In addition, you can tell nginx to satisfy one of these conditions using satisfy any. Thus, the location block might look something like this:
location /files {
    satisfy any;

    allow 10.2.0.0/16;
    allow 10.3.155.26;
    deny all;

    auth_basic "Restricted";
    auth_basic_user_file /etc/nginx/htpasswd;
}
In the above example, any user with an IP of 10.2.0.0-10.2.255.255 and 10.3.155.26 are allowed without a password. For other users, we fall back to basic authentication.
Now, consider a different situation. Perhaps you want employees to access these files only from within the company network, with a password. Employees shouldn’t access these files when outside the company network. This means both conditions need to be satisfied. In order to make this change, change any to all:
location /files {
    satisfy all;

    # Other directives...
}
Conclusion
In this article, we have learnt about HTTP basic authentication and how to use this feature in nginx. It provides a very easy way to restrict people from accessing files on your web server, without having to install anything.