How to Install Gogs, a GitHub-Style Git Remote Service

There are many online services such as GitHub and Bitbucket, which allow users to host Git repositories online. However, when you are working on closed source projects, you may want to use a self-hosted solution. Gogs is a lightweight, web based self-hosted solution that allows you to host your Git repositories online. In fact, if you are familiar with GitHub, you will find yourself right at home using Gogs — they have a very similar interface.
In this article, we are going to learn how to install and set up Gogs on a Linux server. The instructions here should work for recent versions of Ubuntu (16.04 and later), Debian (version 8 and later) and CentOS/RHEL (version 7 and later).
Setting up the system
Before you can get started with Gogs, you will need to set up your system. In order to install Gogs, you should install Git, and optionally you should install SSH and a database such as MySQL or PostgreSQL. Gogs also carries its own bundled copy of SSH, and it can fall back on SQLite when a database isn’t available.
For this article, we will use MySQL as our database and we won’t use git over SSH. Thus, we only need to install Git and MySQL. On a Debian/Ubuntu system, you should run:
sudo apt update
sudo apt install git mysql-server
During the installation, you will be asked to set a password for the MySQL root user. Note down this password as you will need it later.
If you are on CentOS/RHEL, you can install these dependencies using commands below. (At present, CentOS ships with MariaDB, an open source, drop-in replacement for MySQL.)
sudo yum install git mariadb-server
Next, we will set up a restricted user account for Gogs to run on. In our example, we will create a user named gogs with the following command. We’ll also use /bin/true as the shell to prevent anyone from logging in as this user.
sudo useradd -rm gogs -s /bin/true -k ''
Now that we have got the basic things set up, we will move on to setting up the database.
Configuring the database
If you are on Debian/Ubuntu, the database server will be already started when you installed MySQL. However, with CentOS/RHEL, you will need to start it up manually. You will also have to “enable” it so that MySQL starts up whenever your system boots up. In order to do so, run the following commands:
sudo systemctl start mariadb
sudo systemctl enable mariadb
After this step, you should tighten up the security on MySQL by running:
mysql_secure_installation
This command will ask for the root user’s password. If you are a Debian/Ubuntu user, you have already provided a password, so type it in to continue. When the command asks if you would like to set a different password, answer No by entering “n”.
However, if you are a CentOS/RHEL user, you haven’t provided a password yet. Simply leave this field blank and hit Enter to continue. Next, you’ll be asked if you want to set a new password. Answer yes to the question by entering “y”, and enter a password here.
Then, the command will ask a few more questions, like whether it should remove the test database and disallow anonymous users. Answer yes to each of them by entering “y”.
Now, you should set up a user account and a database for Gogs. In order to do so, log in to the MySQL console as root with:
mysql -u root -p
Enter the MySQL root user’s password to continue.
First, you should create a user in MySQL. We will name our user gogs and give it a password super-strong-password:
CREATE USER gogs@localhost IDENTIFIED BY 'super-strong-password';
Then, you should create a database and allow the newly created user to work on the database. We will name our database gogs.
CREATE DATABASE gogs;
GRANT ALL PRIVILEGES ON gogs . * TO gogs@localhost;
Again, you should note down the database name, username and password you used — you will need them later.
Installing Gogs
First, you should grab the latest version of Gogs from the GitHub releases page. In this example, we will use the latest x64 version (0.11.43 at the time of this writing).
wget https://github.com/gogits/gogs/releases/download/v0.11.43/linux_amd64.tar.gz
sudo tar -xf linux_amd64.tar.gz -C /home/
Once you have completed this step, you should fix the permissions on the /home/gogs directory like so:
sudo chown -R gogs: /home/gogs
Now that we have downloaded the binaries and put them in their proper places, we need to tell systemd to start Gogs when the system boots up. In order to do so, create a file in /etc/systemd/system/gogs.service with the following contents:
[Unit]
Description=Gogs git remote daemon

[Service]
User=gogs
Group=gogs
ExecStart=/home/gogs/gogs web
WorkingDirectory=/home/gogs

[Install]
WantedBy=multi-user.target
While it might seem like there’s a lot going on here, it’s actually quite simple. We have told systemd to start up Gogs’ daemon under the gogs user. When the daemon starts up, it will serve the web interface over port 3000. You can change this port with the -p parameter like so:
ExecStart=/home/gogs/gogs web -p 4000
If you want to use a low port value (such as 80), you should grant the CAP_NET_BIND_SERVICE privilege by running:
sudo setcap 'cap_net_bind_service=+ep' /home/gogs/gogs
Then, you need to tell systemd to run this service on boot, and then start it up with:
sudo systemctl enable gogs
sudo systemctl start gogs
You can now visit http://<your_server_IP>:3000/ and you will see the Gogs installation page (pictured below).
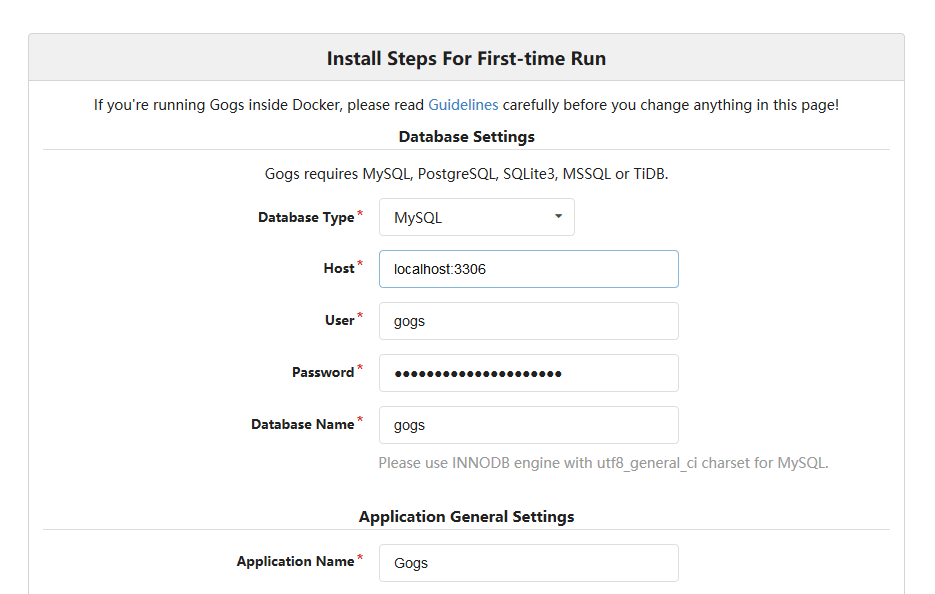
On this page, enter the MySQL database name, username and password you have created for Gogs. You should also set the “Run user” to gogs and change the “Application URL” and “Domain” according to your domain name/IP. Finally, you should review the “Optional Settings” section and configure the administrator account. If you want to enable emails, fill out the SMTP settings.
If everything worked correctly and you have filled in the administrator account details, you will be taken to the dashboard:
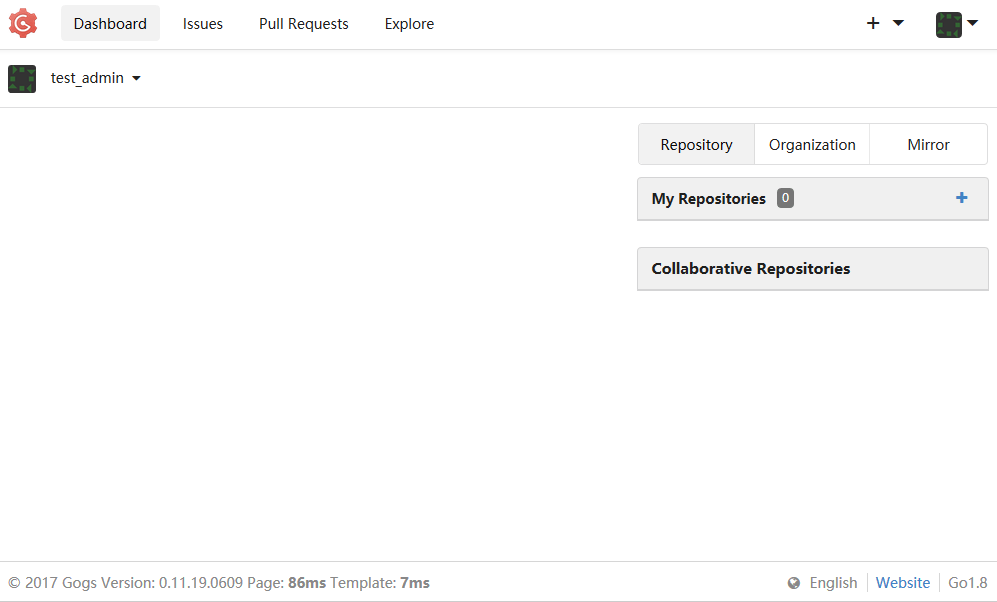
Congratulations! You have installed Gogs successfully. You can now create repositories, push your projects and ask others to register to the service.
Configuring HTTPS
If you are deploying Gogs outside of a trusted internal network, you may want to use HTTPS to protect traffic coming in and leaving out of your Gogs instance. Fortunately, the built-in web server is quite fully featured, and supports HTTPS by default.
First, you should obtain a certificate from a certificate authority, or create a self-signed certificate yourself. (You can follow our Let’s Encrypt guide and follow the “Other web server” instructions to get a free, domain-validated certificate.) Once you have completed this step, open /home/gogs/custom/conf/app.ini in a text editor. Under the [server] section, change the protocol of ROOT_URL from http to https:
ROOT_URL = https://<your_server_hostname>:3000/
In addition, you also need to add these values to the [server] section:
CERT_FILE = /path/to/cert.pem
KEY_FILE = /path/to/key.pem
PROTOCOL = https
Then, restart Gogs with:
sudo systemctl restart gogs
Now, open https://<your_server_hostname>:3000/ in a browser. You will find that HTTPS has been deployed correctly.
If you want to use Gogs over HTTPS without a port number, you need to use port 443. This is a “low port”; and we’ve described how to run Gogs on a low port in the previous section. After you make changes to the service file, you should restart Gogs with:
sudo systemctl daemon-reload
sudo systemctl restart gogs
Running Gogs in combination with another server
If you are running multiple web applications on your server, you may prefer to access Gogs through the main HTTP server (which is usually Apache or nginx). You simply need to proxy all the requests from your main HTTP server to Gogs’ server.
In this article, we will assume you have a server named www.example.com, and you want to deploy Gogs on www.example.com/git. If you want it to be directly available on www.example.com, simply replace all instances of /git in the snippets below with /.
If you are using nginx, you simply need to use the proxy_pass like so:
server {
  # other server configuration

  location /git {
    proxy_pass http://127.0.0.1:3000/;
  }
}
If you are using Apache, you should enable the proxy and proxy_http modules. Then, you can configure Apache in a similar manner:
<VirtualHost *:80>
 # Other configuration
 ProxyPreserveHost On
 ProxyRequests off
 ProxyPass /git http://127.0.0.1:3000/
 ProxyPassReverse /git http://127.0.0.1:3000/
</VirtualHost>
Then, you need to tell Gogs about the URL it’s going to be accessed from. In order to do so, open /home/gogs/custom/conf/app.ini and change the value of ROOT_URL like so:
ROOT_URL = http://www.example.com/git
Finally, you should add a firewall rule to prevent anyone from directly accessing the Gogs installation through port 3000. If you’re using iptables, this is fairly easy to do:
sudo iptables -A INPUT ! -i lo -p tcp --dport 3000 -j DROP
Now you can access Gogs over http://www.example.com/git.
Updating Gogs
When a new version of Gogs comes out, you need to update it. Fortunately, updating Gogs is fairly easy. First, you need to stop the daemon with:
sudo systemctl stop gogs
Then, rename the existing folder, so that we can install the new version:
sudo mv /home/gogs /home/backup
Now, download the latest archive and extract it as we had done previously.
sudo tar -xf linux_amd64.tar.gz -C /home/
Next, copy over the data and logs from the old directory to the new directory:
sudo mv /home/backup/{custom,data,log} /home/gogs
Next, you need to fix the permissions on the new directory:
sudo chown -R gogs: /home/gogs/
Then, you can start up the service again with:
sudo systemctl enable gogs
If anything goes wrong, you can always restore the previous version from the backup directory.
Conclusion
In this article, we’ve seen how to install and configure Gogs. It has very minimal system requirements and features a familiar interface, thus making it a great alternative over other self-hosted git remote servers.
The configuration cheat sheet has some useful information if you want to configure your setup further.