Downloading Torrents over the Web with cloud-torrent

BitTorrent is a peer to peer protocol for sharing files. There are many local clients that allow you to download files via torrents. However, there are times where you may need to download them over the web because you can’t use a local torrent client.
cloud-torrent is a web based torrent-client. It allows you to search torrent trackers, add torrent files and magnet links, and download them on your computer.
In this article we will look at installing cloud-torrent on a server running Linux. You can even run it on your own computer if it is publicly accessible with an IP address.
A word of caution though: if you’re planning to run torrent applications on your server, you may want to confirm whether your provider allows this.
Download and run cloud-torrent
Download the correct version of cloud-torrent from the releases page. Binaries are available for Intel 32- and 64-bit variants, as well as for ARM. In the example below, we have downloaded the 64-bit Linux version:
wget https://github.com/jpillora/cloud-torrent/releases/download/0.8.24/cloud-torrent_linux_amd64.gz
Having downloaded the archive, you have to unpack it, rename the binary and make it executable. To do that, run the following commands:
gzip -d cloud-torrent*.gz
mv cloud-torrent* cloud-torrent
chmod +x cloud-torrent
Then, run the binary:
./cloud-torrent
Now, visit http://your_server_name:3000/ with a browser. If you can see the web interface, that’s great! However, if it’s not working for you, check that:
- You’re not blocking traffic on port 3000 – you need to change your firewall configuration in that case.
- You’re not running an existing service on port 3000. If this is the case, cloud-torrent will exit with an error
listen tcp 0.0.0.0:3000: bind: address already in use. You can run cloud-torrent on a different port, like so:./cloud-torrent -p <custom_port_number>The port number must be anywhere between 1025 and 65535.
To stop cloud-torrent, simply press Ctrl+C.
Setting up cloud-torrent
While cloud-torrent is already working, you probably want it to be started automatically on system startup like a regular system service. You can do this quite easily.
First, you need to set up a separate user for cloud-torrent to run. While it is not strictly necessary to do so, it is generally recommended for better security.
sudo useradd -rm cloud-torrent
Next, you have to move the cloud-torrent binary to the home directory of the new user.
sudo mv cloud-torrent /home/cloud-torrent/cloud-torrent
Now, you need to configure the system to start it automatically. In order to do so, you need to find out the init system that’s in use. To do this run (source):
if [[ `/sbin/init --version` =~ upstart ]]; then echo upstart;
elif [[ `systemctl` =~ -\.mount ]]; then echo systemd;
elif [[ -f /etc/init.d/cron && ! -h /etc/init.d/cron ]]; then echo using sysvinit;
else echo cannot tell; fi
If the output is upstart or sysvinit, you should use the instructions for sysvinit. If the output is systemd, you should use the systemd instructions.
systemd-based systems
With a systemd-based system, this process is quite easy. Create /etc/systemd/system/cloud-torrent.service with the following contents:
[Unit]
Description=torrent web server

[Service]
Type=simple
User=cloud-torrent
WorkingDirectory=/home/cloud-torrent
ExecStart=/home/cloud-torrent/cloud-torrent

[Install]
WantedBy=multi-user.target
If you need to use a different port, you need to put in ExecStart=/home/cloud-torrent/cloud-torrent -p <port_number> instead.
Then, you need to tell systemd that you’ve created a new service file and also set it to run at boot:
sudo systemctl daemon-reload
sudo systemctl enable cloud-torrent.service
Finally, you should start the service immediately so that you can access cloud-torrent:
sudo systemctl start cloud-torrent.service
sysvinit/upstart-based systems
For sysvinit or upstart based systems, you need to add a shell script with the following code in /etc/init.d/cloud-torrent:
#!/bin/sh
### BEGIN INIT INFO
# Provides:          cloud-torrent
# Required-Start:    $local_fs $network $named $time $syslog
# Required-Stop:     $local_fs $network $named $time $syslog
# Default-Start:     2 3 4 5
# Default-Stop:      0 1 6
# Short-Description: starts the cloud-torrent web server
# Description:       starts cloud-torrent using start-stop-daemon
### END INIT INFO

DESC="torrent web server"
NAME=cloud-torrent
DAEMON=/home/cloud-torrent/cloud-torrent

DAEMONUSER=cloud-torrent
PIDFILE=/var/run/$NAME.pid

STOP_SCHEDULE="${STOP_SCHEDULE:-QUIT/5/TERM/5/KILL/5}"

test -x $DAEMON || exit 0

start() {
    start-stop-daemon --start --quiet --make-pidfile --pidfile "$PIDFILE" \
        -d "/home/$DAEMONUSER" --background --chuid "$DAEMONUSER" --oknodo --exec "$DAEMON"
}

stop() {
    start-stop-daemon --stop --quiet --pidfile "$PIDFILE" --retry="$STOP_SCHEDULE" \
        --name "$NAME" --oknodo
    rm -f "$PIDFILE"
}

status() {
    if [ -f "$PIDFILE" ]; then
        if kill -0 $(cat "$PIDFILE"); then
            echo "$NAME is running"
        else
            echo "$NAME process is dead, but pidfile exists"
        fi
    else
        echo "$NAME is not running"
    fi
}

case "$1" in
    start)
        echo "Starting $NAME $DESC..."
        start
    ;;
    stop)
        echo "Stopping $NAME $DESC..."
        stop
    ;;
    restart)
        echo "Restarting $NAME $DESC..."
        stop
        start
    ;;
    status)
        status
    ;;
    *)
        echo "Usage: $0 {start|stop|restart|status}"
        exit 2
    ;;
esac

exit 0
If you need to run cloud-torrent on a different port, simply modify start() in the above shell script like so:
start-stop-daemon --start --quiet --make-pidfile --pidfile "$PIDFILE" \
 -d "/home/$DAEMONUSER" --background --chuid "$DAEMONUSER" --oknodo --exec "$DAEMON" -- -p <port_number>
Then, you need to make the script executable:
sudo chmod +x /etc/init.d/cloud-torrent
Then, you should enable the service to run at boot. We will also start the service immediately. If you use Ubuntu or Debian, run:
sudo update-rc.d cloud-torrent defaults
sudo service cloud-torrent start
However, if you are using CentOS or Fedora, it is a bit more involved. First, you have to install the start-stop-daemon program:
wget https://raw.githubusercontent.com/boolean-world/misc-tools/master/install-start-stop-daemon.sh
sudo bash install-start-stop-daemon.sh
Now, you can enable the service at boot with the following commands:
sudo chkconfig --add cloud-torrent
sudo chkconfig --level 2345 cloud-torrent on
Finally, you can start the service immediately with:
sudo service cloud-torrent start
Exploring cloud-torrent’s interface
If you have followed the steps above, cloud-torrent should be up and running! You can visit http://<your_server_IP>:3000/ to verify this. Now, you can download torrents by pasting magnet links or torrent file links in the text box. In addition, you can enter a search term to search for torrents on common torrenting websites.
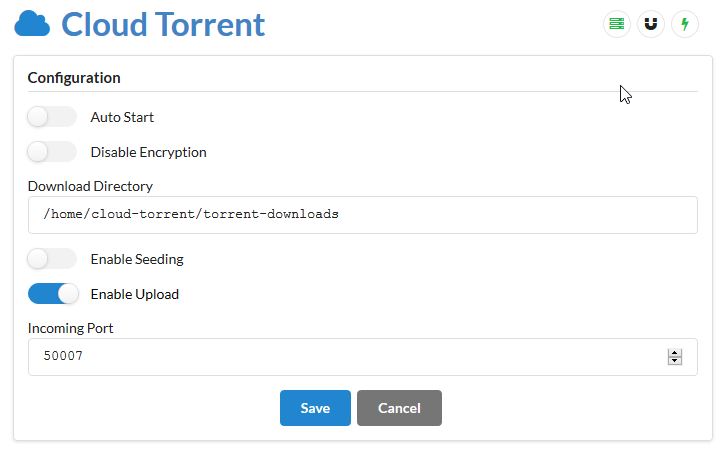
You can configure seeding and encryption settings by clicking on the three bars icon. (See the screenshot below.)
Password protection
The current setup has a problem — anyone who visits it can use it. You can prevent this by setting a password by specifying an environment variable named AUTH.
If you’re using systemd, edit /etc/systemd/system/cloud-torrent.service and put this line in the [Service] section:
Environment="AUTH=username:password"
Then, restart the cloud-torrent service with:
sudo systemctl daemon-reload
sudo systemctl restart cloud-torrent
For sysvinit based systems, simply export the AUTH variable like you would do in a shell script:
# [previous part of shell script]
DAEMONUSER=cloud-torrent
PIDFILE=/var/run/$NAME.pid
export AUTH="username:password"
# [rest of the shell script]
Replace username and password with your own values, and then restart with:
sudo service cloud-torrent restart
Configuring HTTPS
To protect your privacy, you may want to configure HTTPS on cloud-torrent.
First, you need to obtain a certificate. If you don’t have one, you can obtain one through Let’s Encrypt. In the segments below, you should replace /path/to/key.pem and /path/to/cert.pem with the correct paths. If you’re using Let’s Encrypt, you can find these files under the /etc/letsencrypt directory.
For systemd users this will be easy. In /etc/systemd/system/cloud-torrent.service, modify the line containing ExecStart= like so:
ExecStart=/home/cloud-torrent/cloud-torrent -k /path/to/key.pem -r /path/to/cert.pem
Again, for sysvinit/upstart users, it is a bit more involved. Open the /etc/init.d/cloud-torrent file and change the start-stop-daemon command in start() like so:
start-stop-daemon --start --quiet --make-pidfile --pidfile "$PIDFILE" \
 -d "/home/$DAEMONUSER" --background --chuid "$DAEMONUSER" --oknodo --exec "$DAEMON" -- -k /path/to/key.pem -r /path/to/cert.pem
After making these changes, restart the cloud-torrent service as described above. At this point, cloud-torrent should be set up over HTTPS. For more configurable options, be sure to check out the --help switch.