How to Configure nginx as a Load Balancer

For very small websites, a single server running a web application is usually enough. However, this doesn’t work well for larger websites. In such cases, we make use of “load balancing”, a technique that distributes incoming requests to a number of other servers, each running a copy of the web application. This is one of the techniques large websites use to stay up and running even with large volumes of traffic.
Although most people use nginx as a HTTP server, it also has built-in load balancing features. In this article, we’re going to look at how to set it up on your system.
Load balancing basics
Load balancing is a method to distribute workloads across multiple computing resources, such as computers, network links or disks. It aims to improve use of resources, maximize throughput, improve response times, and ensure fault-tolerance. In this article, we will talk specifically about the types of load balancing supported by nginx. However, other applications (such as database servers) can also make use of load balancing.
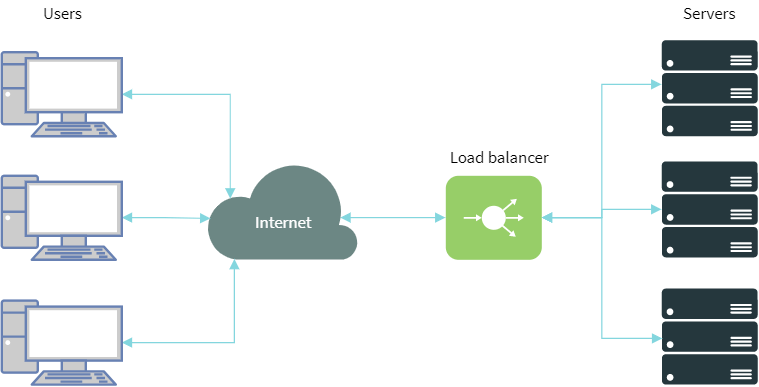
A typical HTTP load balancing setup looks like the one shown in the diagram below. There are many users who send in requests, and a load balancer distributes them to many servers (called backends). Each of these backends run a copy of the same application. When these servers send out a response, the load balancer send proxies them out to the clients.
Load balancers are usually categorized as hardware-based and software-based. Hardware-based load balancers are dedicated equipment, and they carry application-specific integrated circuits (ASICs) that routes traffic very efficiently. On the other hand, software-based load balancers such as nginx or HAproxy perform the load balancing in software.
In addition, load balancing may be performed at various network layers. As the name suggests, layer 4 load balancers balance traffic by inspecting the requests and responses at the transport layer. In addition, there are layer 7 load balancers, which inspect traffic at the application layer to figure things out. The latter is slightly more powerful, as it has a high level view of things. For instance, a layer 7 balancer that’s aware of HTTP can inspect URLs, and dispatch requests to different sets of backends depending upon the URL.
nginx can perform both layer 4 load balancing for TCP and UDP, as well as layer 7 HTTP load balancing. In the next few sections, we’re going to see how to configure nginx for this purpose.
A note about the configuration file
On most Linux distributions, the nginx configuration file is in /etc/nginx/nginx.conf. However, on Debian/Ubuntu, this file is split into two different ones: /etc/nginx/nginx.conf for the main configuration, and /etc/nginx/sites-enabled/default for the individual websites that you host. If you are using Debian/Ubuntu, you should add the upstream blocks into the former, and the location block in the latter.
Load balancing web applications
Before you continue any further, you need to set up a few backend servers where our web application will be running. These servers will be running a HTTP server on each of these servers. For our example, we will assume that we’ve already set them up, and these backend servers are available at 192.168.0.1, 192.168.0.2 and 192.168.0.3. Of course, these need not be internal IPs — they can be external IPs or hostnames as well.
Now, there are two things you need to configure nginx as a load balancer. First, in the http section, you need to specify a set of backend servers with an upstream block. Then, you need to proxy these requests to the servers. In order to do so, open the configuration file and add the following lines:
http {
  upstream backend1 {
    server 192.168.0.1;
    server 192.168.0.2;
    server 192.168.0.3;
  }

  server {
    listen 80;

    location / {
      proxy_pass http://backend1;
    }
  }
}
This tells nginx to pass over HTTP requests for any URL to the set of backend servers we’ve named backend1. If you want to pass over specific URLs only, you could do something like:
location /shop {
proxy_pass http://backend1;
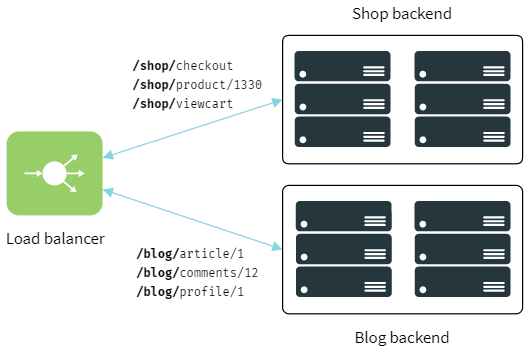
}This will match all URLs that begin with “/shop” and hand them over to the backend servers. You can also extend this concept to pass over different URLs to different backends. In this example, we’ve added another backend for the servers that host a blog. Then we’ve configured nginx to pass over URLs that begin with “/blog” to the new backend.
upstream backend1 {
  # list of servers
}

upstream backend2 {
  # list of servers
}

location /shop {
  proxy_pass http://backend1;
}

location /blog {
  proxy_pass http://backend2;
}
nginx also supports a couple proxying to a couple of other protocols with directives such as FastCGI and uWSGI with the fastcgi_pass and uwsgi_pass directives. Say, for example, there is a PHP-FPM daemon running on every backend server on port 9000, and you want to proxy the requests to them. This is how the configuration would look like:
http {
  upstream backend1 {
    server 192.168.0.1:9000;
    server 192.168.0.2:9000;
    server 192.168.0.3:9000;
  }

  server {
    listen 80;

    location / {
      fastcgi_pass backend1;
    }
  }
}
Load balancing strategies
nginx has a couple of strategies to pick a server to send requests to. By default, it uses a round robin algorithm to decide the server to which a request should be sent. However, other strategies are available too, which you can enable manually. The least_conn strategy chooses a server that is handling the least number of connections. On the other hand, the ip_hash strategy chooses servers based on the result of running a hash function on the IP. This means that requests from the same IP end up going to the same server.
To use a strategy other than the default, simply mention its name in the upstream block:
upstream backend  {
  ip_hash;
  server 192.168.0.1;
  server 192.168.0.2;
  server 192.168.0.3;
}
There’s also a a generic hash directive, which can be used on any HTTP value. In this example, we’ve distributed requests based on the URL:
hash $request_uri;You can further change the default strategy by assigning weights to a server. By default, all servers have a weight of 1, which means that nginx does not “prefer” a server over another, apart from applying the rules of the strategy used. An example configuration with weights looks like the following:
upstream backend  {
  server 192.168.0.1 weight=4;
  server 192.168.0.2 weight=2;
  server 192.168.0.3;
}
As you can tell, we’re using the round robin strategy in this example. With the weights we’ve shown in the example above, every 4 out of 7 requests would go to the first server, 2 of them to the second, and 1 to the third. (As we’ve mentioned previously, the default weight is 1, so we’ve left it out in the above example.)
Other advanced configuration
When nginx proxies requests to these servers, it also passively performs a health check. If a server fails to send out a response, it is automatically marked as such, and nginx avoids sending requests to it for some time. The fail_timeout value controls the time till which nginx avoids sending requests to the server. The max_fails value sets the number of requests that should fail, after which nginx marks the server as such.
In the example below, we’ve set max_fails to 3, and the fail_timeout to 20 seconds for the first server:
upstream backend  {
  server 192.168.0.1 max_fails=3 fail_timeout=20s;
  server 192.168.0.2;
}
In addition, you can mark a particular server to be treated differently. If you’re performing maintenance on one of the backend servers, you can mark it as down. The requests that would be processed by this server are now sent over to the next server in the group. You can also mark a particular server as a backup server. Requests will be passed to it when all other servers are unavailable. An example of these two directives is shown below:
upstream backend  {
  server 192.168.0.1;
  server 192.168.0.2;
  server 192.168.0.3 down;
  server 192.168.0.4 backup;
}
Some common problems
Depending upon the kinds of applications that you have deployed, a load balancer may cause certain problems. Often, you will get 404 or other errors from the web application. This is usually because the “Host” header contains the address of the backend server instead of its original value. To fix this, you can manually set it in the location block:
location / {
  proxy_set_header Host $host;
  proxy_pass http://backend;
}
Many complex web applications store state locally, and they can fail to work if a load balancer distributes requests of a session across different servers. In order to resolve this, the load balancer must keep track of the original backend server that responded to the initial request. This concept is known as “session persistence”. Unfortunately, this feature is only available in the commercial version of nginx. However, as a workaround, you can try the ip_hash directive, which will forward requests from the same IP to the same backend server. IPs usually don’t change very frequently, so this may work well enough for your use case.
Transport layer load balancing
As we’ve mentioned previously, nginx can also perform load balancing at transport layer. The syntax is slightly different than the one we’ve seen previously. Specifically, both the upstream and server sections are contained inside a stream block.
To use this feature, you have to compile nginx with the --with-stream flag. On Debian and Ubuntu, the version of nginx in the repositories is already compiled with this flag, so you can directly use it.
Suppose, you have a number of DNS servers, and you want to use nginx as a load balancer. You simply need to put this in the configuration file:
stream {
  upstream dns_backends {
    server 8.8.8.8:53;
    server 8.8.4.4:53;
  }

  server {
    listen 53 udp;
    proxy_pass dns_backends;
    proxy_responses 1;
  }
}
Here, we’ve defined a number of DNS backends, and then configured nginx to listen to incoming UDP packets on port 53. The proxy_pass directive sends them over to the backend servers. Also, by default, nginx expects that the backend may send out one or more responses. Because there’s going to be a single reply against a single request, we’ve set proxy_responses to 1.
Load balancing with TCP is quite similar.
stream {
  upstream tcp_backend {
    server srv1.example.com:3306;
    server srv2.example.com:3306;
  }
  server {
    listen 3306;
    proxy_pass tcp_backend;
  }
}
The load balancing strategies and other configuration options that we’ve described previously also apply here.
Conclusion
nginx provides powerful load balancing capabilities with a wide variety of options. If you want to learn more, be sure to check out the official documentation.