How to Get an Unix/Linux Environment on Windows with MSYS2

If you’re a Unix/Linux user who also has to work with Windows systems, you’ve probably wished that Windows was more Unix-like. An Unix-like environment provides many advantages — the powerful text processing tools, using SSH to remotely manage systems, being able to control every aspect of a system, the list goes on.
While Windows has been lacking in this regard, other people have created similar tools emulate the Unix environment. In this article, we’re going to look at how to set-up an Unix-like environment for Windows, named MSYS2.
So, what is MSYS2?
MSYS2 is a port of a collection of standard Unix/Linux utilities to Windows. It provides shells, development tools and version control system programs. Because it provides tools like gcc, it is also useful to compile Windows versions of Unix-like programs!
In addition, MSYS2 comes with pacman, the package manager from Arch Linux.
I already use Bash On Windows/Cygwin, how is it better?
If you already know about or use Bash On Windows/Cygwin, you might be thinking “why should I use MSYS2”? Probably one of the biggest arguments is MSYS2 handles file paths correctly. Both Cygwin and Bash on Windows have problems when you try to invoke normal Windows programs with Unix-like paths. On the other hand, MSYS2 handles things like this without a hitch:
start notepad++ /c/Users/John/file.txtYou get to keep that Unix-ish style to your commands, even when working with Windows programs!
Both Cygwin and MSYS2 can be used to compile Windows version of Unix/Linux programs. However, Cygwin uses a compatibility layer that tries to simulate Linux better, and it comes at a huge performance cost. MSYS2 compromises better compatibility for performance, which means MSYS2 should be significantly faster.
If you’re using Bash on Windows, one of the disadvantages is you won’t have the huge choice of packages that Ubuntu provides. This shouldn’t be a problem though — most software for Linux also has a Windows version which you can download separately.
Installation
You can find the MSYS2 downloads here. It’s available in both 32-bit(i686) and 64-bit(x86-64) variants. Download and run the installer and follow through the steps — at the end, you’ll end up with MSYS2 installed in C:\msys32 or C:\msys64 depending on whether your system is 32- or 64-bit. (In this article, we’ll assume that it was installed in C:\msys32.)
You’ll also find a folder named “MSYS2 32/64 bit” in your start menu, which contains shortcuts to launch a MSYS2 shell. Most often, you’ll need the “MSYS2 MSYS” shell. (We’ll see the purpose of the other “MSYS2 MinGW” shells in a minute.) If you fire up the shortcut, you’ll find a Bash shell starting up. The shortcut doesn’t use Windows’ default console window; it uses a terminal emulator named mintty.
Launch the “MSYS2 MSYS” shortcut, and run pacman -Syu to update all packages and the locally cached repository information. MSYS2 should now be ready for your use, and you can install other applications like Python and Ruby (or something else) through pacman.
Adding MSYS2 to your PATH variable
The MSYS2 tools (and that includes tools like grep) won’t be available if you don’t launch them through the Start Menu shortcut. To make them available everywhere, you need to add them to the “Path” variable like so:
- Open the Run box by pressing Windows + R, and type in
systempropertiesadvanced. - Click on the “Environment Variables” button.
- In the “System Variables” section, scroll down and double-click on the “Path” variable.
- If you’re on Windows 7/8, add the text
C:\msys32\usr\bin;C:\msys32\usr\local\bin;to the beginning of the variable value. If you’re on Windows 10, add theC:\msys32\usr\binandC:\msys32\usr\local\binfolders to the list, and move these two entries to the top.
You’ll now be able to access MSYS2 tools everywhere, including the Windows Command Prompt and the Run box. This means you can do stuff like this in the Command Prompt:
C:\Users\Admin>ipconfig /all | grep 'IPv4 Address'
   IPv4 Address. . . . . . . . . . . : 192.168.56.10(Preferred)
   IPv4 Address. . . . . . . . . . . : 10.122.203.7(Preferred)
The difference between MinGW32/64 and MSYS2
As we’ve already said, MSYS2 can be used to compile Unix programs for Windows. MSYS2 also comes with a file named msys-2.0.dll that provides a lightweight compatibility layer. This layer is why you can work with Unix paths on MSYS2 programs that work seamlessly for Windows programs — behind the scenes, it converts these paths. However, even this layer has some overhead; and if you’re building Unix programs for people who don’t care about Unix compatibility, it’s even more pointless.
The MinGW shells allows you to use compilers and libraries that don’t depend on this layer. In fact, the number of library packages provided in the MinGW repositories is far higher than the number of MSYS2 packages.
Let’s say, you’ve been looking for the MinGW version of gcc. First, you need to locate the package:
$ pacman -Ss gcc
mingw32/mingw-w64-i686-gcc 6.3.0-2 (mingw-w64-i686-toolchain)
    GNU Compiler Collection (C,C++,OpenMP) for MinGW-w64
mingw64/mingw-w64-x86_64-gcc 6.3.0-2 (mingw-w64-x86_64-toolchain)
    GNU Compiler Collection (C,C++,OpenMP) for MinGW-w64
msys/gcc 6.3.0-1 (msys2-devel)
    The GNU Compiler Collection - C and C++ frontends
Say, you want to use the 32-bit MinGW version of gcc. You can install it with:
$ pacman -Ss mingw-w64-i686-gccWhen you’re compiling a program with this library, you should start up the “MSYS MinGW 32 bit” shortcut and work on that shell. It will automatically configure the shell to use the MinGW packages.
The “behind the scenes” view
If you’re an intermediate/advanced user, you probably want to know what’s going on behind the scenes when you use these different shortcuts. The easiest way to know this is to use declare.
From the MinGW shell, run:
$ declare > mingw-configAgain, run this from the MSYS2 shell:
$ declare > msys2-configNow, you can diff these files to see the differences in environment variables. Here we’ve only shown what has changed; the actual diff is a whole lot longer.
+ACLOCAL_PATH=/mingw32/share/aclocal:/usr/share/aclocal
-CONFIG_SITE=/etc/config.site
+CONFIG_SITE=/mingw32/etc/config.site
-MANPATH=/usr/local/man:/usr/share/man:/usr/man:/share/man
+MANPATH=/mingw32/share/man:/usr/local/man:/usr/share/man:/usr/man:/share/man
+MINGW_CHOST=i686-w64-mingw32
+MINGW_MOUNT_POINT=/mingw32
+MINGW_PACKAGE_PREFIX=mingw-w64-i686
+MINGW_PREFIX=/mingw32
-MSYSTEM=MSYS
+MSYSTEM=MINGW32
-MSYSTEM_CHOST=x86_64-pc-msys
-MSYSTEM_PREFIX=/usr
+MSYSTEM_CHOST=i686-w64-mingw32
+MSYSTEM_PREFIX=/mingw32
-PATH=/usr/local/bin:/usr/bin:/bin:/opt/bin:[other paths]
+PATH=/mingw32/bin:/usr/local/bin:/usr/bin:/bin:/opt/bin:[other paths]
-PKG_CONFIG_PATH=/usr/lib/pkgconfig:/usr/share/pkgconfig:/lib/pkgconfig
+PKG_CONFIG_PATH=/mingw32/lib/pkgconfig:/mingw32/share/pkgconfig
Setting up SSH
One of the best parts about an Unix-like system is SSH. It is a secure text-based protocol that allows you to work on remote computers. You can even use it for transferring files and use it as a proxy server.
Fortunately, setting up a SSH server is quite easy. First, we need to install the openssh package:
$ pacman -S opensshUnlike most Unix-like systems, simply installing the package won’t enable the server. You need to create keys for the SSH server to use:
$ ssh-keygen -f /etc/ssh/ssh_host_rsa_key -N '' -t rsa
$ ssh-keygen -f /etc/ssh/ssh_host_dsa_key -N '' -t dsa
$ ssh-keygen -f /etc/ssh/ssh_host_ecdsa_key -N '' -t ecdsa
$ ssh-keygen -f /etc/ssh/ssh_host_ed25519_key -N '' -t ed25519
Now, open /etc/ssh/sshd_config (In our case, it’s located in C:\msys32\etc\ssh\sshd_config). Then, set the following preferences in the file:
UsePrivilegeSeparation no
PasswordAuthentication yes
The openssh server generally needs a “privilege seperation user” to provide better security against attacks. However, since it’s difficult to set up such an user on Windows, we disable it by setting UsePrivilegeSeparation to No. (This doesn’t reduce the security of the server; running as a different user is a defense-in-depth measure.)
We’ll also enable password authentication in SSH by setting PasswordAuthentication to yes. For the purposes of this article, we won’t set up key based authentication in SSH.
Now, try running the server with:
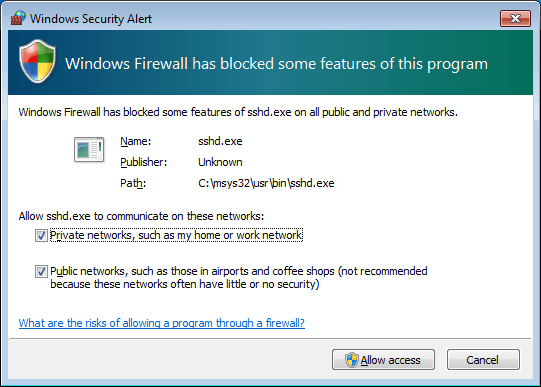
$ /usr/bin/sshdAt this point, you’ll find a warning from Windows Firewall. Depending upon how you want to access your computer, select the option to allow access on public and private networks.
The SSHD process should detach from the terminal. You can check if the server is working by trying to connect from it locally with:
$ ssh -l <your_windows_username> localhostIf your Windows username contains spaces, you can write it in double quotes.
Starting the SSH server on system boot
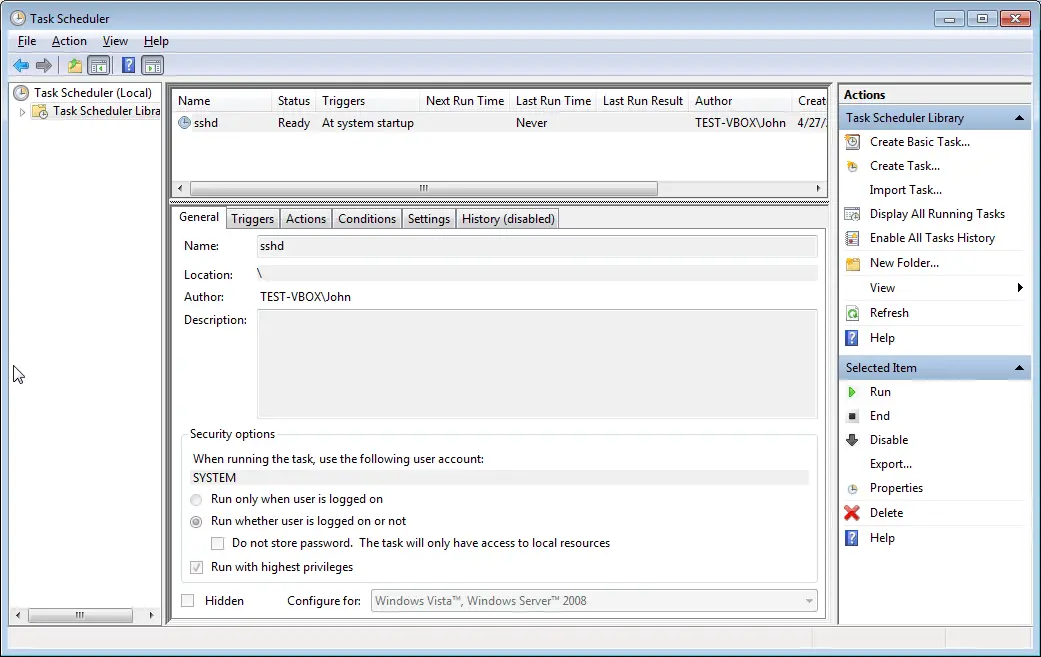
Now that we have our SSH server up and running, we need a way to way to auto-start it when the system boots up. We can do this by adding a scheduled task:
- Open the Run box by pressing Windows + R, and type in
taskschd.msc. - Select “Task Scheduler Library” from the left panel. Right click on it and select “Create Task”.
- In the “General” tab, give the task a name. Click on the “Change User or Group” button, and add “SYSTEM” as an object name. Then, click “OK” to save the user settings.
- Select the “Run with highest privileges” checkbox.
- Under the “Triggers” tab, add a trigger to begin the task “At startup”.
- In the “Actions” tab, add a new action that starts up the
sshd.exeprogram. In our case, the full path to it will beC:\msys32\usr\bin\sshd.exe. - Under the “Conditions” tab, uncheck all conditions.
- Under the “Settings” tab, uncheck the “Stop the task if it runs longer than” option.
- Finally, click on “OK” to create a scheduled task.
You’ll find that a task has been created in the Task Scheduler window:
Now, restart your system and try logging in locally. If everything went well, you should be able to log in locally. You can also verify if you can connect from another computer.
Conclusion
Although Windows doesn’t provide satisfactory Unix-like tooling by default, there are projects like MSYS2 which address this nicely. If you’ve followed through this article, you now have a system that allows you to work on an Unix-like system on Windows.
Have you run into any problems while setting this up? Do you know of other methods to set up an Unix-like system on Windows? Let us know in the comments below!