A Guide to the Linux “Find” Command

The find command allows users to search for files and take actions on them. It is part of the “findutils” package and comes bundled with all distributions. It is highly flexible, allowing you to look for files and directories based on a variety of conditions. Optionally, it also allows you to take different types of actions on the results.
In this article, we will understand how to work with the find command. We will also illustrate its usage through various examples throughout this article.
Introduction
The basic structure of the find command is like so:
find [paths] [expression] [actions]
The find command takes a number of paths, and searches for files and directories in each path “recursively”. Thus, when the find command encounters a directory inside the given path, it looks for other files and directories inside it. Again, if there are other directories inside, the find command will look inside them as well. This process continues till it has searched for all items inside the path you specified.
By default, the find command finds everything inside a directory. If you want to filter some of them out based on certain criteria, you can specify an expression to do so.
The default action is to print all the results. However, you can also specify a custom action that the find command can take on the results.
These concepts will become clearer as we go through various examples mentioned later in this article.
Finding all files and directories
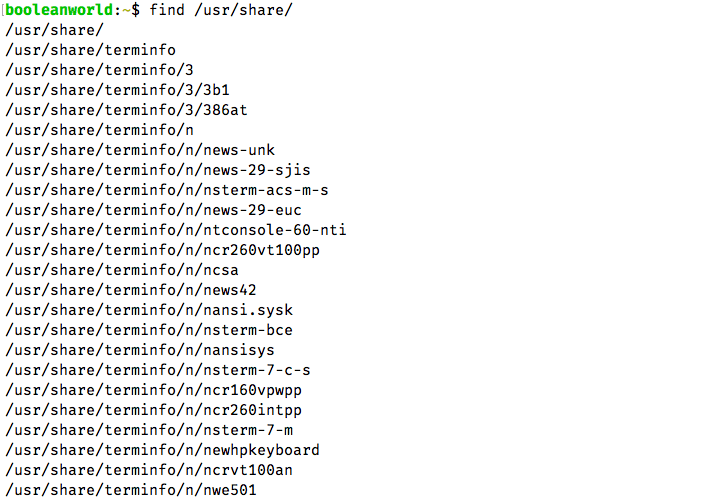
Imagine that you want to list all the directories and files for a given path. For example, if you want to list the contents of the /usr/share directory, run:
find /usr/share
This will give you a list of files and directories, as shown in the screenshot below. Depending upon the contents of the directory, this list can be very large!
If you want to list the contents of multiple directories, you can do this like so:
find /usr/share /bin /usr/lib
If you want to list the contents of the current working directory, use a period(.) as the path:
find .
When there are no paths, the find command assumes that it should work with the current directory. So, you can leave the . and simply use:
find
Finding items by their name
As we mentioned previously, you can filter the results of the find command using expressions. In this section, we will learn how to filter items by their name.
If you want to find a file or directory named NEWS.txt inside the /usr directory, use the -name switch like so:
find /usr -name NEWS.txt
The -name switch is case sensitive. If you don’t know the exact case of the item you’re looking for, you can use the -iname switch which is case insensitive:
find /usr -iname news.txt
The -name and -iname switches also accept “wildcards”, which are special characters that act as placeholders. There are two wildcards — the ? character represents a single unknown character, and the * character represents any number of unknown characters (including zero).
If you want to use a wildcard character, you should keep the name/iname parameter inside single or double quotes. Since the * and ? characters are also special characters for the shell, putting them in quotes ensures that the command works correctly.
As an example, if you have to search for all files and directories inside /usr that have a .txt at the end of their name, you can use:
find /usr -name '*.txt'
If you want to search for files and directories with four letters in their name, run:
find /usr -name '????'
Sometimes, you may want to match the full path to a file/directory, instead of just matching the name. In such a situation you can use the -path switch. As an example, say you want to find all files and directories with a .txt at the end of their name, but only if they are in a directory named src. Thus, in the full path, there will be a /src/ somewhere in the middle, and a .txt at the end. So, the command will be:
find /usr -path '*/src/*.txt'
There is also the -ipath switch, which is the case insensitive version of -path.
Searching for files or directories
All the examples we’ve seen so far return files and directories. However, if you need to search for either files or directories only, you can use the -type switch. The most common parameters of -type are:
f: filesd: directoriesl: symbolic links
For example, to find all the files in the /usr directory, run:
find /usr -type f
You can also combine the various switches of the find command. For example, to find all .txt files in the /usr directory, you can use:
find /usr -type f -name '*.txt'
Similarly, to find directories inside /usr that begin with “python”, use:
find /usr -type d -name 'python*'
Finding empty files
The find command supports the -empty flag to search for files and directories that are empty. An empty file is one that has no content in it, whereas an empty directory is one that has no files or subdirectories in it.
For example, if you want to find list empty directories in your home directory, you can run:
find ~ -type d -empty
Negating matches
The find command also allows you to “negate” a match. This is useful when we have a criteria to exclude from our search.
As an example, say you want to find files in the /usr directory which don’t have the .txt extension. You can negate the -name switch by adding a exclamation mark (!) in front of it, as shown:
find /usr -type f ! -name '*.txt'
You can also invert any other switch. So, if you want to find the non-empty directories in your home directory, run:
find /usr -type f ! -empty
Searching based on ownership
The find command supports searching for files and directories based on their ownership information.
To find the files or directories that belong to a particular user, you can use the -user switch. For example, if you want to find all files on the system that belong to the user booleanworld, run:
find / -type f -user booleanworld
You can also use a user’s ID in the above command, instead of the username. You can look up an user’s ID with the following command:
id -u <username>
Likewise, the -group switch allows you to look for files and directories that belong to a particular group. It can also accept a group name, or a group ID. You can view a user’s group ID with the following command:
id -g <username>
Searching for files based on date and time
Sometimes, you may need to search for files depending on when it was accessed or modified. On a Linux system, there are three types of “time” associated with a file:
- Modification time: The last time when the file’s content was modified.
- Access time: The last time when the file was read.
- Change time: The last time when the file (either its content or metadata, such as permissions) were modified.
To find files based on the modification, access or change time, the find command has the -mtime, -atime and -ctime switches. These switches allows you to filter files based on the number of days. Here, a “day” refers to a period of 24 hours.
Let us understand how to use these flags. As an example, if you use -mtime, then:
-mtime 2: The file was modified 2 days ago (i.e. in the last 48 to 72 hours).-mtime -2: The file was modified less than 2 days ago (i.e. within the last 48 hours).-mtime +2: The file was modified more than 2 days ago (i.e. 3 or more days, which means 72 hours or later).
So, to find files in /usr which were modified two days ago, run:
find /usr -type f -mtime 2
The -atime and -ctime switches work exactly in the same way as -mtime.
If you find that a day is a bit too long, you can also use -mmin, -amin or -cmin to filter in minutes. So, -amin +5 means files that were accessed more than 5 minutes ago, -amin -5 means the file was modified less than 5 minutes ago, and so on.
You can use many of these flags at once. If you want to find files modified 2 days ago and accessed 5 minutes ago, run:
find /usr -type f -mtime 2 -amin 5
You can even repeat the same flag! As an example, you want to find files modified between 50 and 100 days ago, use:
find /usr -type f -mtime +50 -mtime -100
Searching based on size
The find command has a -size switch to allow users to find files based on their size. Since only files can have a file size, when you use this switch no directories will be listed.
To specify the file size, we put a number followed by a letter to represent the unit. You can use the following letters:
c: bytesk: kilobytesM: megabytesG: gigabytes
In addition, you can use a + or - to impose a “greater than” or “less than” condition.
Let us understand this with a few examples. If you want to list all files on the system with a size of 10 KB, use:
find / -size 10k
In order to find files that are more than 1 GB in size, use:
find / -size +1G
Similarly, to find files that are less than 10MB in size, use:
find / -size -10M
Searching based on permissions
The find command supports the -perm switch to allow searches based on permissions. It allows you to search based on both numeric and symbolic modes. If you’re unfamiliar with permissions, you can find an overview here.
Using symbolic permissions
Let us begin with a simple example. Suppose, you want to search for all files and directories in the /usr directory with permissions of rwxr-xr-x. In order to do so, run:
find /usr -perm u=rwx,g=rx,o=rx
The letters u, g and o stand for “user”, “group” and “owner” respectively.
You can also use the letter a to check for permissions that apply to all users. For example, to find all files and directories on the system with the permission r-xr-xr-x, run:
find /usr -perm a=rx
Often, we are interested to match a subset of the permissions. For example, you may want to search for files on the system that can be executed by all users. In this case, we only care that the execute bit is set for all three permission classes. However, the rest of the bits may be set or unset.
Since all permission classes should have the execute bit set, we write the permission as a=x. Then, we add a / in front to indicate that we intend to match a subset of permissions. Thus, the command is:
find / -type f -perm /a=x
Using numeric permissions
Let us consider the first example in the previous section. This is pretty straightforward — rwxr-xr-x is 644 in numeric mode, so you can simply run:
find /usr -perm 644
Checking for subset of permissions is a little more complex. As we mentioned previously, searching for files that everyone can execute involves checking if the execute bit is set. We don’t care about the other bits. For every bit that we should check, we put a 1, and for the rest we put a 0. With this process, we obtain a binary number and we convert it to octal as shown:
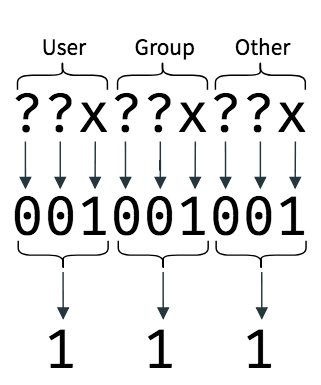
Next, we add a - in front of this number to indicate that we intend to match a subset of permissions. Thus, the command is:
find / -type f -perm -111
Searching based on access rights flags
Now, say you’re interested to search based on the numeric rights flags. For this purpose, you can use either numeric or symbolic modes.
As an example, say you’re interested to find all files on your system with the setuid bit set. We can extend what we learnt about numeric modes to this situation. In this case, we only care about the setuid flag, which has a value of 4. However, we don’t care about any of the permission bits, which means we get 000. Thus, we can search for these files using:
find / -type f -perm -4000
Of course, you can also filter for permission bits as well. If you’re interested in files that all users can execute, and also have the setuid bit set, replace 4000 with 4111 in the above command. (We’ve previously seen how we get the value 111.)
Similarly, you can use 2000 for the setgid bit and 1000 for the sticky bit. If you want to test for a combination of these bits, add up the values. For example, to test for the setuid and sticky bit, you would use 5000 (= 4000 + 1000).
If you want to do the same with symbolic modes, you can use:
find / -type f -perm /u=s
For the setgid bit, use /g=s, and for the sticky bit use /o=t. To test for a combination of these bits, separate them with commas, such as /u=s,o=t.
Limiting the depth of traversal
As we mentioned previously, the find command looks for items recursively. However, the results obtained may be very large, and you might want to set a limit on how deep the find command can search. This can be done with the -maxdepth switch.
If you run the following command, you will notice that all the displayed items are no more than three levels deep:
find / -maxdepth 3
In other situations, you may want to set a limit on the minimum depth. The find command also supports the -mindepth switch for this purpose. So, if you run:
find / -mindepth 3
Logical operations in the find command
In the previous sections, we have seen the flags supported by the find command. We have also seen how we can combine various flags and negate them. In some situations, we need more powerful constructs.
The find command supports “and” and “or” conditions with the -a and -o switches. It also supports grouping parts of an expression with parentheses (). However, since parentheses are also special characters for the shell, you should put them in single or double quotes. In addition, when you specify multiple flags one after the other, the find command automatically assumes an “and”.
Let us consider an example we saw before — finding directories inside /usr that begin with “python”. There, we used the command:
find /usr -type d -name 'python*'
You can also write the “and” explicitly like so:
find /usr -type d -a -name 'python*'
Now, let us consider a different example. Suppose, you want to search files/directories on the system which were modified in the last 5 minutes or earlier than 50 days. For this command, we will use the “or” operator like so:
find / -mmin -5 -o -mtime +50
Next, suppose we impose an additional restriction to the above problem — you want to search for files only. First, we will keep the conditions for filtering modified files in a group. Then, we will “and” it with the condition to find files. Thus, the final command is:
find / '(' -mmin -5 -o -mtime +50 ')' -a -type f
Since the -a is implicit, you can also leave it out of the above command.
Taking actions
So far, all the find commands print the results on the terminal. Usually, we want to perform some actions with these results, such as copying or deleting these items. Fortunately, the find command also supports taking “actions” on these results.
The default action is to print all the results; you can verify this by adding the -print switch at the end of any find command. There are many other actions as well. We will look at some of the most useful ones below.
Deleting files
To delete any files or directories, use the -delete action. It works with both files and directories. For example, if you want to delete all the empty directories from the home directory, run:
find ~ -type d -empty -delete
Executing commands
The find command also supports executing a custom command with the -exec switch.
Suppose, you want to back up all your MP3 audio from your home directory to your external hard drive. Assume that the external hard drive is available at /media/MyDrive. To copy a single file, you would use:
cp <path to file> /media/MyDrive
To copy all the files, you can use the following command.
find ~ -type f -name '*.mp3' -exec cp {} ';'
Here, the pair of braces ({}) act as the placeholder for the path to the file. In order to tell the file command where the command ends, we use a semicolon(;). However, since it is also a special character for the shell, we wrap it in single quotes.
Whenever the find command finds a file matching the condition, it replaces the braces with the actual path, and executes the command. So, the cp command is executed for every MP3 file.
Let us look at another important use — finding a string across many files. To find the string “hello” in a file, we use grep like so:
grep hello <file name>
If you are familiar with grep, you might be tempted to write a command like this:
find ~ -type f -exec grep hello {} ';'
However, if you use this command, you will immediately understand the problem. We want a list of files with the string “hello”; however we get a list of matched lines. Fortunately, grep has a -l switch, which makes it print the path of the file if there is a match. So, the command will be:
find ~ -type f -exec grep -l hello {} ';'
Executing commands: a different variant
Suppose, you want to create a compressed file. To create a Gzip-compressed file with the name music.tar.gz, you would run:
tar -czf music.tar.gz <list of files>
Now, suppose you want to compress all MP3 files in your home directory, to a single compressed file. Perhaps you would come up with the following:
find ~ -type f -name '*.mp3' -exec tar -czf music.tar.gz {} ';'
However, if you open the music.tar.gz file, you will notice that there’s only one MP3 file. Remember that find executes the command every time it finds a new file. So, the previous file got overwritten with a new archive every time; and we don’t want that to happen.
All of our problems could be solved if there was a way to tell find to pass a list of files to tar, after it has found all the files. This is where the second variant of the -exec switch comes in. Instead of ending the command with a ;, we use a + like so:
find ~ -type f -name '*.mp3' -exec tar -czf music.tar.gz {} +
Executing commands on directories
Sometimes, it is useful to execute a command on the directory inside which a file/directory present. The find command has a -execdir switch which does this. It is similar to -exec in all other ways, and even has the + and ; variants.
Viewing file information
If you want to view information about the files/directories (such as permissions and size), you can use the -ls switch. For example, if you want to view details about files on the system that are bigger than 1GB, run:
find / -type f -size +1G -ls
Removing error messages
While trying some of the find commands, you may have got some errors such as “Permission denied”. You can hide these error messages by redirecting them to /dev/null, as shown:
find [paths] [expression] [actions] 2>/dev/null
Conclusion
In this article, we’ve seen how to use the find command, along with examples that cover most of the use cases. If you want to read more, you can read the man page by typing man find in your terminal.