An In-Depth Guide to iptables, the Linux Firewall
The Linux kernel comes with a packet filtering framework named netfilter. It allows you to allow, drop and modify traffic leaving in and out of a system. A tool, iptables builds upon this functionality to provide a powerful firewall, which you can configure by adding rules. In addition, other programs such as fail2ban also use iptables to block attackers.
In this article, we’re going to take a look at how iptables works. We’re also going to look at a few examples, which will help you write your own rules.
Contents
How does iptables work?
iptables is just a command-line interface to the packet filtering functionality in netfilter. However, to keep this article simple, we won’t make a distinction between iptables and netfilter in this article, and simply refer to the entire thing as “iptables”.
The packet filtering mechanism provided by iptables is organized into three different kinds of structures: tables, chains and targets. Simply put, a table is something that allows you to process packets in specific ways. The default table is the filter table, although there are other tables too.
Again, these tables have chains attached to them. These chains allow you to inspect traffic at various points, such as when they just arrive on the network interface or just before they’re handed over to a process. You can add rules to them match specific packets — such as TCP packets going to port 80 — and associate it with a target. A target decides the fate of a packet, such as allowing or rejecting it.
When a packet arrives (or leaves, depending on the chain), iptables matches it against rules in these chains one-by-one. When it finds a match, it jumps onto the target and performs the action associated with it. If it doesn’t find a match with any of the rules, it simply does what the default policy of the chain tells it to. The default policy is also a target. By default, all chains have a default policy of allowing packets.
Now, we’re going to take a deeper look into each of these structures.
Tables
As we’ve mentioned previously, tables allow you to do very specific things with packets. On a modern Linux distributions, there are four tables:
- The filter table: This is the default and perhaps the most widely used table. It is used to make decisions about whether a packet should be allowed to reach its destination.
- The mangle table: This table allows you to alter packet headers in various ways, such as changing TTL values.
- The nat table: This table allows you to route packets to different hosts on NAT (Network Address Translation) networks by changing the source and destination addresses of packets. It is often used to allow access to services that can’t be accessed directly, because they’re on a NAT network.
- The raw table: iptables is a stateful firewall, which means that packets are inspected with respect to their “state”. (For example, a packet could be part of a new connection, or it could be part of an existing connection.) The raw table allows you to work with packets before the kernel starts tracking its state. In addition, you can also exempt certain packets from the state-tracking machinery.
In addition, some kernels also have a security table. It is used by SELinux to implement policies based on SELinux security contexts.
Chains
Now, each of these tables are composed of a few default chains. These chains allow you to filter packets at various points. The list of chains iptables provides are:
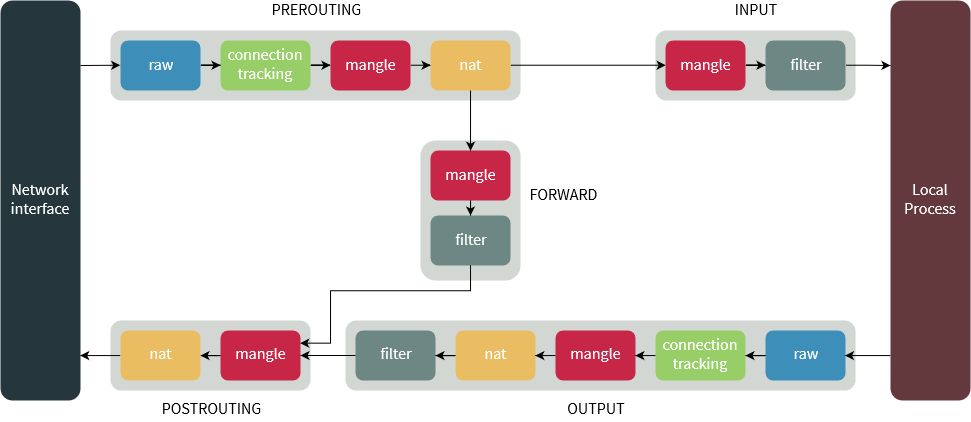
- The PREROUTING chain: Rules in this chain apply to packets as they just arrive on the network interface. This chain is present in the nat, mangle and raw tables.
- The INPUT chain: Rules in this chain apply to packets just before they’re given to a local process. This chain is present in the mangle and filter tables.
- The OUTPUT chain: The rules here apply to packets just after they’ve been produced by a process. This chain is present in the raw, mangle, nat and filter tables.
- The FORWARD chain: The rules here apply to any packets that are routed through the current host. This chain is only present in the mangle and filter tables.
- The POSTROUTING chain: The rules in this chain apply to packets as they just leave the network interface. This chain is present in the nat and mangle tables.
The diagram below shows the flow of packets through the chains in various tables:
Targets
As we’ve mentioned before, chains allow you to filter traffic by adding rules to them. So for example, you could add a rule on the filter table’s INPUT chain to match traffic on port 22. But what would you do after matching them? That’s what targets are for — they decide the fate of a packet.
Some targets are terminating, which means that they decide the matched packet’s fate immediately. The packet won’t be matched against any other rules. The most commonly used terminating targets are:
- ACCEPT: This causes iptables to accept the packet.
- DROP: iptables drops the packet. To anyone trying to connect to your system, it would appear like the system didn’t even exist.
- REJECT: iptables “rejects” the packet. It sends a “connection reset” packet in case of TCP, or a “destination host unreachable” packet in case of UDP or ICMP.
On the other hand, there are non-terminating targets, which keep matching other rules even if a match was found. An example of this is the built-in LOG target. When a matching packet is received, it logs about it in the kernel logs. However, iptables keeps matching it with rest of the rules too.
Sometimes, you may have a complex set of rules to execute once you’ve matched a packet. To simplify things, you can create a custom chain. Then, you can jump to this chain from one of the custom chains.
Now that we know about the theory behind iptables, we’ll look at some examples.
A note regarding iptables commands
There are two versions of the Internet Protocol — IPv4 and IPv6. These protocols have some differences and are handled differently in the kernel. Thus, iptables provides different commands for these protocols — iptables for IPv4 and ip6tables for IPv6.
However, the options accepted by these commands doesn’t vary too much. We’ve discussed these differences later in the appropriate sections in this article.
You also need to execute all iptables commands as root. You can launch a root shell by typing in su -c and then typing in your root password and then run the commands in this article. Alternatively, you can add sudo in front of every iptables command.
Blocking IPs
The most common use for a firewall is to block IPs. Say for example, you’ve noticed the IP 59.45.175.62 continuously trying to attack your server, and you’d like to block it. We need to simply block all incoming packets from this IP. So, we need to add this rule to the INPUT chain of the filter table. You can do so with:
iptables -t filter -A INPUT -s 59.45.175.62 -j REJECT
Let us break that down. The -t switch specifies the table in which our rule would go into — in our case, it’s the filter table. The -A switch tells iptables to “append” it to the list of existing rules in the INPUT chain. However, if this is the first time you’re working with iptables, there won’t be any other rules, and this will be the first one.
As you might have guessed, the -s switch simply sets the source IP that should be blocked. Finally, the -j switch tells iptables to “reject” traffic by using the REJECT target. If you want iptables to not respond at all, you can use the DROP target instead.
Previously, we’ve mentioned that the filter table is used by default. So you can leave it out, which saves you some typing:
iptables -A INPUT -s 59.45.175.62 -j REJECT
You can also block IP ranges by using the CIDR notation. If you want to block all IPs ranging from 59.145.175.0 to 59.145.175.255, you can do so with:
iptables -A INPUT -s 59.45.175.0/24 -j REJECT
If you want to block output traffic to an IP, you should use the OUTPUT chain and the -d flag to specify the destination IP:
iptables -A OUTPUT -d 31.13.78.35 -j DROP
Listing rules
Now, say that we’ve blocked a couple of IPs by appending rules. If you want to see these rules later, you can use the -L switch. Also, as we will see in the next section, it’s very helpful to see line numbers for these rules, so we’ll also use the --line-numbers switch.
iptables -L --line-numbers
Running this command gives us a list of rules like the ones below. This list is also from the filter table, and you can list other tables with the -t switch.
Chain INPUT (policy ACCEPT)
num target prot opt source destination
1 DROP all -- 59.45.175.0/24 anywhere
2 DROP all -- 221.194.47.0/24 anywhere
3 DROP all -- 91.197.232.104/29 anywhere
Chain FORWARD (policy ACCEPT)
num target prot opt source destination
Chain OUTPUT (policy ACCEPT)
num target prot opt source destination
1 DROP all -- anywhere 31.13.78.0/24
In our example, we’ve blocked three IP ranges in the INPUT chain and one in the OUTPUT chain. There are no rules in the FORWARD chain.
iptables also tries to be helpful by doing reverse DNS lookups on the IPs. Often, this is unnecessary and slows down the listing process. To disable this, you can use the -n switch:
iptables -L -n --line-numbers
Deleting rules
Now, say you’ve blocked the IP range 221.194.47.0/24 by mistake. Removing it is easy: simply replace -A with -D, which deletes a rule:
iptables -D INPUT -s 221.194.47.0/24 -j REJECT
You can also delete rules through their line numbers. If you want to delete the second rule from the INPUT chain, the command would be:
iptables -D INPUT 2
When you delete a rule that isn’t the last rule, the line numbers change, so you might end up deleting the wrong rules! So, if you’re deleting a bunch of rules, you should first delete the ones with the highest line numbers. If you were deleting the 9th and 12th rules from the INPUT chain, you would run:
iptables -D INPUT 12
iptables -D INPUT 9
Sometimes, you may need to remove all rules in a particular chain. Deleting them one by one isn’t practical, so there’s the -F switch which “flushes” a chain. For example, if you want to flush the filter table’s INPUT chain, you would run:
iptables -F INPUT
Inserting and replacing rules
So far, we have seen examples of appending and deleting rules. It turns out that you can also insert rules at a given position! This is useful in a number of cases. We’ll use the previous example in the Listing rules section. While you’re seeing attacks from 59.45.175.0/24, assume that you need to whitelist 59.45.175.10.
Since iptables evaluates rules in the chains one-by-one, you simply need to add a rule to “accept” traffic from this IP above the rule blocking 59.45.175.0/24. So, if you run the command:
iptables -I INPUT 1 -s 59.45.175.10 -j ACCEPT
This rule is inserted at the first line, and it makes the rule blocking 59.45.175.0/24 come to the second line. You can verify this by listing the rules:
Chain INPUT (policy ACCEPT)
num target prot opt source destination
1 ACCEPT all -- 59.45.175.10 0.0.0.0/0
2 DROP all -- 59.45.175.0/24 0.0.0.0/0
3 DROP all -- 221.192.0.0/20 0.0.0.0/0
4 DROP all -- 91.197.232.104/29 0.0.0.0/0
You can also replace rules with the -R switch. As an example, perhaps you whitelisted the wrong IP, and typed in 59.45.175.12 instead of 59.45.175.10. Since the new rule is on the first line, you can replace it with the correct rule like so:
iptables -R INPUT 1 -s 59.45.175.10 -j ACCEPT
Protocols and modules
So far, we’ve seen examples of blocking IPs. However, you can do a lot more, by using modules and protocol based matching.
We’ll begin with a simple example. Say, you want to block all incoming TCP traffic. This isn’t too useful, but it’s an useful starting point. You simply need to specify the protocol with -p like so:
iptables -A INPUT -p tcp -j DROP
You can also specify other protocols such as udp or icmp. To work with ICMP traffic on ip6tables, you’ll need to use ipv6-icmp as the protocol.
Let us consider a more useful example this time. Say, you need to block SSH access for an IP range. You have to first match all TCP traffic, like we did in the example above. Then, to check the destination port, you should first load the tcp module with -m. Next, you can check if the traffic is intended to the SSH destination port by using --dport. Thus, the entire command would be:
iptables -A INPUT -p tcp -m tcp --dport 22 -s 59.45.175.0/24 -j DROP
Now, perhaps you want to block SSH and VNC access for the IP range. While you can’t specify multiple ports with the tcp module, you can do so with the multiport module. Then, you can specify the port numbers with --dports. The final command would be:
iptables -A INPUT -p tcp -m multiport --dports 22,5901 -s 59.45.175.0/24 -j DROP
Let us consider another example. Say, you want to block ICMP address mask requests (type 17). First, you should match ICMP traffic, and then you should match the traffic type by using icmp-type in the icmp module:
iptables -A INPUT -p icmp -m icmp --icmp-type 17 -j DROP
In the next section, we’re going to look at a very important module: the connection tracking module. In addition, we’re also going to look at other modules later in this article.
The connection tracking module
If you’ve tried blocking certain IPs on the INPUT chain, you might have noticed an interesting caveat — you can’t access the services hosted on those IPs either! You might think that rules in the INPUT chain are somehow affecting traffic on the OUTPUT chain, but that isn’t the case. The packets from your system do reach the server. However, the packets that the server sends to your system get rejected. (See the next section for an additional example.)
What we really need here is a way to tell iptables to not touch packets that are part of an existing connection. Fortunately, iptables is a stateful firewall, and it provides a connection tracking module named “conntrack” for this purpose. Connections tracked by this module will be in one of the following states:
- NEW: This state represents the very first packet of a connection.
- ESTABLISHED: This state is used for packets that are part of an existing connection. For a connection to be in this state, it should have received a reply from the other host.
- RELATED: This state is used for connections that are related to another ESTABLISHED connection. An example of this is a FTP data connection — they’re “related” to the already “established” control connection.
- INVALID: This state means the packet doesn’t have a proper state. This may be due to several reasons, such as the system running out of memory or due to some types of ICMP traffic.
- UNTRACKED: Any packets exempted from connection tracking in the raw table with the NOTRACK target end up in this state.
- DNAT: This is a virtual state used to represent packets whose destination address was changed by rules in the nat table.
- SNAT: Like DNAT, this state represents packets whose source address was changed.
Thus, you need to place a rule like the one below, usually at the very top. (If this isn’t the first rule, use -I to place it at the top.) The --ctstate switch sets the states. On some older kernels, this module is named state and the switch is named --state instead of --ctstate.
iptables -A INPUT -m conntrack --ctstate RELATED,ESTABLISHED -j ACCEPT
In addition, it’s generally a good idea to drop any packets in INVALID state. You can place it just below the position where you placed the above rule.
iptables -A INPUT -m conntrack --ctstate INVALID -j DROP
Changing the default policy
Previously, we’ve explained the concept of a default policy. By default, the default chains have a default policy of accepting all traffic. This is also something that you can see in the list of rules:
Chain INPUT (policy ACCEPT)
...
Chain FORWARD (policy ACCEPT)
...
Chain OUTPUT (policy ACCEPT)
..
You can change the default policy with the -P switch. Perhaps you’re configuring iptables for your home computer, and you don’t want any local programs to receive inbound connections. Once you’ve set iptables to accept packets from related and established connections, you can switch the INPUT chain’s policy to DROP with:
iptables -P INPUT DROP
Keep in mind that you should first accept packets from established and related connections before using this rule! If you don’t, you’ll find out that you can’t use any internet based applications, becuase the responses coming in through the INPUT chain will be dropped.
Selecting interfaces
Since iptables matches packets to every rule in a chain, things can get really slow when there are a lot of rules. In such cases, it’s useful to exempt certain kinds of traffic.
For example, on a typical Nginx/PHP-FPM stack, Nginx communicates with PHP over localhost, which uses the loopback interface. Similarly, PHP may connect to a database server like Redis using the loopback interface. It’s useless to filter these kinds of traffic, so you can allow it. The loopback interface is typically named lo and you can add a rule like this at the top of the INPUT chain:
iptables -A INPUT -i lo -j ACCEPT
The -i flag specifies the input interface. Here, we’ve assumed that the INPUT chain is empty and you’re adding the first rule. If that isn’t the case, you need to use the -I switch to add it at the top.
For the OUTPUT chain, you’ll need to use the -o flag, which stands for “output interface”. As an example, say you want to block the IP range 121.18.238.0/29, only when you’re on WiFi. If the WiFi interface is named wlan0, you can add a rule like the one below:
iptables -A OUTPUT -o wlan0 -d 121.18.238.0/29 -j DROP
Negating conditions
At this point, we’ve seen many examples on how to match packets based on certain conditions. However, in some cases, you may need to negate these condition checks. iptables provides the negation operator (!) for this purpose.
A very common way to run node.js or Go web applications on a server is to place a server such as nginx in front of them. Once you’ve configured nginx to forward traffic to the app, there’s no need for it to be directly accessible. In other words, you simply need to accept TCP traffic intended for HTTP, HTTPS and SSH — and you could drop the rest:
iptables -A INPUT -p tcp -m multiport ! --dports 22,80,443 -j DROP
However, you should first accept packets from established and related connections before using this rule! If you don’t, you’ll find out that you can’t use any TCP based applications. This is because legitimate TCP traffic would be dropped, too.
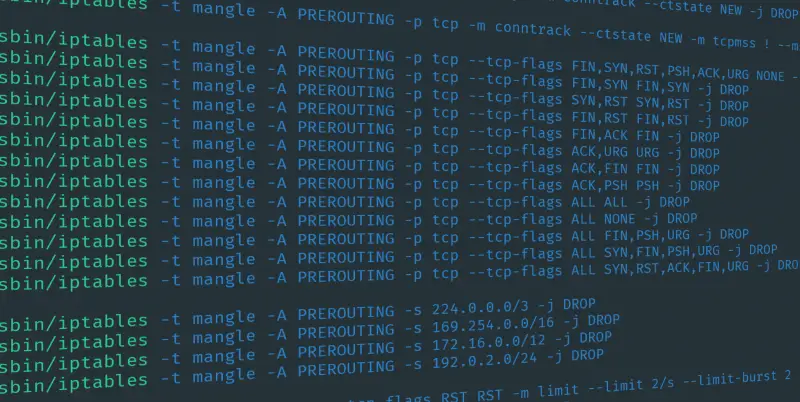
Blocking invalid TCP packets with the tcp module
Now that we know quite a bit about iptables, let us design some rules to block invalid TCP packets. The tcp module has a --tcp-flags switch, and you can use it to check individual TCP flags. This switch takes in two arguments: a “mask” and a set of “compared flags”. The mask selects the flags that should be checked, while the “compared flags” selects the flags that should be set in the packet.
Now, say for example, you want to block Christmas tree packets. So, you need to check “all” the flags, but only FIN, PSH and URG will be set. So, you can write a rule like so:
iptables -A INPUT -p tcp -m tcp --tcp-flags ALL FIN,PSH,URG -j DROP
In addition, there are many other types of invalid packets that you could reject too. For example, a packet with SYN and FIN set is invalid. In this case, you need to only check for these flags and verify if they’re set. So, the rule would be:
iptables -A INPUT -p tcp -m tcp --tcp-flags SYN,FIN SYN,FIN -j DROP
Next, we’ll consider another kind of invalid packet — a “new” connection that doesn’t begin with a SYN. Here, you simply need to check the FIN, RST, ACK and SYN flags; however only SYN should be set. Then, you can negate this condition. Finally, you can use conntrack to verify if the connection is new. Thus, the rule is:
iptables -A INPUT -p tcp -m conntrack --ctstate NEW -m tcp ! --tcp-flags FIN,SYN,RST,ACK SYN -j DROP
Limiting packets: the limit module
In this section, we’re going to look at another module: limit. The job of this module is to place a limit to the number of packets passing through.
In order to understand how this module works, we’ll use an analogy. Suppose, you’re given a bucket containing 5 tokens. Whenever a packet comes in, you should throw out a token. Also, you can’t allow a packet if the bucket is empty. In addition, you can add back tokens at the rate of 3 in an hour (or 1 in 20 minutes). Technically, the number of tokens is the “limit-burst” value, and the rate at which you can refill it is the “limit” value.
Now, suppose 10 packets arrive on your system. In order to accept the first five packets, you throw out the first five tokens. Because your bucket is now empty, you have to discard the rest. In fact, you can’t accept any more packets for the next 20 minutes, because your bucket will be empty till that time. Now, suppose 45 minutes pass and three packets arrive. You can accept just the first two since your bucket now has just two tokens. If 100 minutes had passed without you receiving a packet, the bucket would have been completely refilled.
As a practical example, suppose you want to ratelimit ICMP packets. A rule like this can do the job:
iptables -A INPUT -p icmp -m limit --limit 1/sec --limit-burst 1 -j ACCEPT
As long as the traffic is within the given limits, packets will be accepted. However, as soon as the flow of packets exceed this limit, the traffic passes through this rule over to the other rules. Thus, you should set a default policy of DROP on the INPUT chain for this to work.
Per-IP packet limits: the recent module
Unfortunately, the limit module can’t handle a dynamic, per IP restriction. This is where the recent module comes in.
Perhaps you’ve been facing some brute force attacks on your SSH server. Usually, attackers try to make many connections to speed up their attack. So, you can place a per-IP restriction like so, which will slow down the attackers:
iptables -A INPUT -p tcp -m tcp --dport 22 -m conntrack --ctstate NEW -m recent --set --name SSHLIMIT --rsource
iptables -A INPUT -p tcp -m tcp --dport 22 -m conntrack --ctstate NEW -m recent --set --name SSHLIMIT --update --seconds 180 --hitcount 5 --name SSH --rsource -j DROP
We’ve set a name for the limit module by which it can keep track of things — in our case, it’s “SSHLIMIT”. The first line adds the source IP to the list that the recent module maintains. If the IP is already on this list, then the entry for this IP is updated. In the next line, we check whether the counter has hit the value of 5 in 180 seconds. If that’s indeed the case, we drop the packet. Thus, this allows 4 new SSH connections from an IP in 3 minutes.
Some recent kernels also have a --mask parameter. This allows you to put restrictions on IP ranges. So for example, if you want to do restrict an entire /24, you can run:
iptables ... -m recent ... --mask 255.255.255.0
Since the recent module provides based on the name, it’s possible to do quite a few tricks. For example, if you remove the conditions to match SSH from the second line, it would drop all traffic from the attacker. You can use this to block attackers completely from your system, if you wish.
The owner module
On a home computer, it’s often useful to block traffic on a per user basis. The owner module can help you with this job.
As an example, suppose you use a shared computer at your home. You’d like to block a particular website which as the IP 31.13.78.35 for your child. Assume that your child uses an account with the username bobby. So, the iptables rule will be:
iptables -A OUTPUT -d 31.13.78.35 -m owner --uid-owner bobby -j DROP
You can also use a numeric user ID or a range (such as 1000-1006) for the argument. Similarly, you can match packets of a group by using the --gid-owner packet.
The owner module is valid only in the OUTPUT and POSTROUTING chains.
Custom chains
Sometimes, you may need to do some complex processing on the same packet over and over. For example, say you want to allow SSH access just for a couple of IP ranges. With the types of rules we’ve seen so far, you’d have to do something like:
iptables -A INPUT -p tcp -m tcp --dport 22 -s 18.130.0.0/16 -j ACCEPT
iptables -A INPUT -p tcp -m tcp --dport 22 -s 18.11.0.0/16 -j ACCEPT
iptables -A INPUT -p tcp -m tcp --dport 22 -j DROP
Unfortunately, this is a bit unwieldy and inefficient. A better way to organize these rules would be to use custom chains. First, you need to make a custom chain. We’ll name ours ssh-rules:
iptables -N ssh-rules
Then, you can add the rules for the IPs in the new chain. Of course, we aren’t limited to matching IPs — you can do just about anything here. However, since custom chains don’t have a default policy, make sure you end up doing something to the packet. Here, we’ve added a last line that drops everything else. There’s also the RETURN target, which allows you to return to the parent chain and match the other rules there — it’s similar to a non-terminating target.
iptables -A ssh-rules -s 18.130.0.0/16 -j ACCEPT
iptables -A ssh-rules -s 18.11.0.0/16 -j ACCEPT
iptables -A ssh-rules -j DROP
Now, you should put a rule in the INPUT chain that refers to it:
iptables -A INPUT -p tcp -m tcp --dport 22 -j ssh-rules
Using a custom chain carries many advantages. For example, you can entirely manage this chain through a script, and you don’t have to worry about interfering with the rest of the chain.
If you want to delete this chain, you should first delete any rules that reference to it. Then, you can remove the chain with:
iptables -X ssh-rules
Logging packets: the LOG target
We’ve worked with a number of terminating targets. We’ll now shift our focus to a commonly used non-terminating target: LOG. As its name suggests, it logs the nature of the packet matched in the kernel logs. The location of the log depends on the distribution, but it’s usually in /var/log/syslog or /var/log/messages.
This target is fairly easy to use. As an example, say you want to log invalid TCP packets before dropping them. You should first log the packet, and then drop it:
iptables -A INPUT -p tcp -m tcp --tcp-flags FIN,SYN FIN,SYN -j LOG
iptables -A INPUT -p tcp -m tcp --tcp-flags FIN,SYN FIN,SYN -j DROP
The LOG target also takes a --log-prefix option, and you can use this so that you can search the log easily later:
iptables -A INPUT -p tcp -m tcp --tcp-flags FIN,SYN FIN,SYN -j LOG --log-prefix=iptables:
iptables-save and iptables-restore
The iptables/ip6tables commands provide a way to insert, delete and manage rules. However, the workflow isn’t particularly nice. First, you have to first list the existing rules. Next, you need to figure out where a new rule should go, and then write a command to insert the rule. Fortunately, iptables also comes with two commands, iptables-save and iptables-restore. (The IPv6 equivalents are ip6tables-save and ip6tables-restore). These commands dump rules from all chains and filters into standard output. You can redirect it to a file like so:
iptables-save > iptables.rules
Now, you can edit this file comfortably with a text editor. When you’re done, you can apply these rules with:
iptables-restore < iptables.rules
You can also use them to persist iptables rules, as we’ll see in the next section.
Preserving iptables rules across reboots
Unfortunately, it turns out that iptables rules aren’t persistent — they’re lost when you reboot your system. On distributions such as RHEL and CentOS, there’s a package named “iptables-services” which you can install with:
sudo yum install iptables-services
On Debian and Ubuntu, you can install the “iptables-persistent” package that does the same thing.
sudo apt install iptables-persistent
Internally, both of these packages run the iptables-save/restore commands to save iptables configuration to a file.
If your distribution doesn’t have a similar package, you can simply write a service file that loads iptables rules from a file when it starts up, and saves it when it stops.
Conclusion
A firewall is an important security tool for network administrators. As we’ve seen, iptables provides a very powerful firewall that you can use to secure your systems. We’ve covered a number of examples here that should be helpful to design iptables rules for the systems you manage.
Also, if case you’re willing to read more about iptables, this is a good resource (if a bit long). iptables-extensions’ man page and the netfilter extension documentation also covers a few other modules we haven’t covered here.